一图流教程

  1. [BlogRoot]\source文件夹下新建一个文件夹css,该文件夹用于存放自定义的css样式,再新建一个名为custom.css,在里面写入以下代码:

    1
    2
    3
    4
    5
    6
    7
    8
    9
    10
    11
    12
    13
    14
    15
    16
    17
    18
    19
    20
    21
    22
    23
    /* 页脚与头图透明 */
    #footer {
    background: transparent !important;
    }
    #page-header {
    background: transparent !important;
    }

    /* 白天模式遮罩透明 */
    #footer::before {
    background: transparent !important;
    }
    #page-header::before {
    background: transparent !important;
    }

    /* 夜间模式遮罩透明 */
    [data-theme="dark"] #footer::before {
    background: transparent !important;
    }
    [data-theme="dark"] #page-header::before {
    background: transparent !important;
    }
  2. 在主题配置文件[BlogRoot]\_config.butterfly.yml文件中的inject配置项的head子项加入以下代码,代表引入刚刚创建的custom.css文件(这是相对路径的写法)

    1
    2
    3
    inject:
    head:
    - <link rel="stylesheet" href="/css/custom.css" media="defer" onload="this.media='all'">
  3. 在主题配置文件[BlogRoot]\_config.butterfly.yml文件中的index_imgfooter_bg配置项取消头图与页脚图的加载项避免冗余加载

    1
    2
    3
    4
    5
    # The banner image of home page
    index_img:

    # Footer Background
    footer_bg: false
  4. 部分人反映一图流改完了背景图也没了,那大概率是你之前没设置背景图。在主题配置文件[BlogRoot]\_config.butterfly.yml文件中的background配置项设置背景图

    1
    background: url(https://creammint-pic-1304832043.cos.ap-hongkong.myqcloud.com/img/home_bg.webp)

页脚跳动的心

  1. 打开Butterfly\layout\includes\footer.pug,找到

    1
    .copyright!= `&copy;${nowYear} by ${config.author}`
  2. 替换成如下内容,其实就是把by替换成一个爱心标签,给一个id为heartbeat

    1
    .copyright!= `&copy;${nowYear} <i id="heartbeat" style="color:#FF6A6A" class="fa fa-heartbeat"></i> ${config.author}`
  3. [butterfly]\source文件夹下新建一个名为heartbeat.css,在里面写入以下代码:

    1
    2
    3
    4
    5
    6
    7
    8
    9
    10
    11
    12
    13
    14
    15
    16
    17
    18
    19
    20
    21
    22
    23
    24
    25
    26
    27
    28
    29
    30
    31
    32
    33
    34
    35
    36
    37
    38
    39
    40
    41
    42
    43
    44
    45
    46
    47
    48
    49
    50
    51
    52
    53
    54
    55
    56
    57
    58
    59
    60
    61
    62
    63
    64
    65
    66
    67
    68
    69
    70
    71
    72
    73
    74
    75
    76
    77
    78
    79
    80
    81
    82
    83
    84
    85
    /* 跳动的心 */
    #heartbeat {
    color: red;
    animation: iconAnimate 1.33s ease-in-out infinite;
    }
    @-moz-keyframes iconAnimate {
    0%,
    100% {
    transform: scale(1);
    }
    10%,
    30% {
    transform: scale(0.9);
    }
    20%,
    40%,
    60%,
    80% {
    transform: scale(1.1);
    }
    50%,
    70% {
    transform: scale(1.1);
    }
    }
    @-webkit-keyframes iconAnimate {
    0%,
    100% {
    transform: scale(1);
    }
    10%,
    30% {
    transform: scale(0.9);
    }
    20%,
    40%,
    60%,
    80% {
    transform: scale(1.1);
    }
    50%,
    70% {
    transform: scale(1.1);
    }
    }
    @-o-keyframes iconAnimate {
    0%,
    100% {
    transform: scale(1);
    }
    10%,
    30% {
    transform: scale(0.9);
    }
    20%,
    40%,
    60%,
    80% {
    transform: scale(1.1);
    }
    50%,
    70% {
    transform: scale(1.1);
    }
    }
    @keyframes iconAnimate {
    0%,
    100% {
    transform: scale(1);
    }
    10%,
    30% {
    transform: scale(0.9);
    }
    20%,
    40%,
    60%,
    80% {
    transform: scale(1.1);
    }
    50%,
    70% {
    transform: scale(1.1);
    }
    }
  4. 在主题配置文件[BlogRoot]\_config.butterfly.yml文件中的inject配置项的head子项加入以下代码,代表引入刚刚创建的heartbeat.css文件(这是相对路径的写法)

    1
    2
    3
    inject:
    head:
    - <link rel="stylesheet" href="/css/heartbeat.css">

配置文件CDN替换

主题默认的CDN有:local、cdnjs、jsdelivr、unpkg等,但是速度偶读比较一般,要想提高部分标准静态资源的响应速度,走CDN是最好的办法,最好是在国内的CDN。

参考教程:

  1. CSDN:Web前端常用CDN网站汇总
  2. 洪哥:Butterfly CDN链接更改指南,替换jsdelivr提升访问速度
  3. 安知鱼:目前可用cdn整理

修改教程,我分享一下我目前在用的方案:

修改主题配置文件_config.butterfly.ymlCDN配置项:

1
2
3
4
5
6
7
8
9
10
11
12
13
14
15
16
17
18
19
20
21
22
23
24
25
26
27
28
29
30
31
32
33
34
35
36
37
38
39
40
41
42
43
44
45
46
47
48
49
50
51
52
53
54
55
56
57
58
59
60
61
62
63
64
65
66
67
68
69
70
71
# CDN
# Don't modify the following settings unless you know how they work
# 非必要請不要修改
CDN:
# The CDN provider of internal scripts (主題內部 js 的 cdn 配置)
# option: local/jsdelivr/unpkg/cdnjs/custom
# Dev version can only choose. ( dev版的主題只能設置為 local )
internal_provider: local

# The CDN provider of third party scripts (第三方 js 的 cdn 配置)
# option: local/jsdelivr/unpkg/cdnjs/custom
# when set it to local, you need to install hexo-butterfly-extjs
third_party_provider: cdnjs

# Add version number to CDN, true or false
version: false

# Custom format
# For example: https://cdn.staticfile.org/${cdnjs_name}/${version}/${min_cdnjs_file}
custom_format:

option:
# main_css:
# main:
# utils:
# translate: https://cdn1.tianli0.top/npm/js-heo@1.0.6/translate/tw_cn.js
# local_search:
# algolia_js:
algolia_search_v4: https://cdn.staticfile.org/algoliasearch/4.14.3/algoliasearch-lite.umd.min.js
instantsearch_v4: https://cdn.staticfile.org/instantsearch.js/4.49.2/instantsearch.production.min.js
pjax: https://lib.baomitu.com/pjax/0.2.8/pjax.min.js
# gitalk: https://lf6-cdn-tos.bytecdntp.com/cdn/expire-1-M/gitalk/1.7.2/gitalk.min.js
# gitalk_css: https://lf6-cdn-tos.bytecdntp.com/cdn/expire-1-M/gitalk/1.7.2/gitalk.min.css
# blueimp_md5:
# valine: https://lf3-cdn-tos.bytecdntp.com/cdn/expire-1-M/valine/1.4.16/Valine.min.js
# disqusjs: https://lf3-cdn-tos.bytecdntp.com/cdn/expire-1-M/disqusjs/1.3.0/disqus.js
# disqusjs_css: https://lf6-cdn-tos.bytecdntp.com/cdn/expire-1-M/disqusjs/1.3.0/disqusjs.css
twikoo: https://cdn.staticfile.org/twikoo/1.6.8/twikoo.all.min.js
# waline_js: https://lf3-cdn-tos.bytecdntp.com/cdn/expire-1-M/waline/1.5.4/Waline.min.js
# waline_css:
sharejs: https://lib.baomitu.com/social-share.js/1.0.16/js/social-share.min.js
sharejs_css: https://lib.baomitu.com/social-share.js/1.0.16/css/share.min.css
# mathjax: https://cdn.staticfile.org/mathjax/3.2.2/es5/mml-chtml.min.js
# katex: https://lib.baomitu.com/KaTeX/latest/katex.min.css
# katex_copytex:
# mermaid:
# canvas_ribbon:
# canvas_fluttering_ribbon:
# canvas_nest:
lazyload: https://lf3-cdn-tos.bytecdntp.com/cdn/expire-1-M/vanilla-lazyload/17.3.1/lazyload.iife.min.js
instantpage: https://lf3-cdn-tos.bytecdntp.com/cdn/expire-1-M/instant.page/5.1.0/instantpage.min.js
typed: https://lf9-cdn-tos.bytecdntp.com/cdn/expire-1-M/typed.js/2.0.12/typed.min.js
# pangu:
fancybox_css_v4: https://cdn.staticfile.org/fancyapps-ui/4.0.31/fancybox.min.css
fancybox_v4: https://cdn.staticfile.org/fancyapps-ui/4.0.31/fancybox.umd.min.js
# medium_zoom: https://lf6-cdn-tos.bytecdntp.com/cdn/expire-1-M/medium-zoom/1.0.6/medium-zoom.min.js
# snackbar_css: https://lf3-cdn-tos.bytecdntp.com/cdn/expire-1-M/node-snackbar/0.1.16/snackbar.min.css
# snackbar: https://lf6-cdn-tos.bytecdntp.com/cdn/expire-1-M/node-snackbar/0.1.16/snackbar.min.js
# activate_power_mode:
# fireworks:
# click_heart:
# ClickShowText:
fontawesomeV6: https://lf6-cdn-tos.bytecdntp.com/cdn/expire-1-M/font-awesome/6.0.0/css/all.min.css
# flickr_justified_gallery_js: https://cdn.staticfile.org/flickr-justified-gallery/2.1.2/fjGallery.min.js
# flickr_justified_gallery_css: https://cdn.staticfile.org/flickr-justified-gallery/2.1.2/fjGallery.min.css
aplayer_css: https://lf6-cdn-tos.bytecdntp.com/cdn/expire-1-M/aplayer/1.10.1/APlayer.min.css
aplayer_js: https://lf6-cdn-tos.bytecdntp.com/cdn/expire-1-M/aplayer/1.10.1/APlayer.min.js
meting_js: https://cdn1.tianli0.top/npm/js-heo@1.0.12/metingjs/Meting.min.js
# prismjs_js: https://cdn1.tianli0.top/npm/prismjs@1.1.0/prism.js
# prismjs_lineNumber_js: https://cdn1.tianli0.top/npm/prismjs/plugins/line-numbers/prism-line-numbers.min.js
# prismjs_autoloader: https://cdn1.tianli0.top/npm/prismjs/plugins/autoloader/prism-autoloader.min.js

修改完成后可以 f12->源代码->网页 看看是否已经加载到对应的资源

文章双栏布局

安装插件

1
2
3
4
5
npm i hexo-butterfly-article-double-row --save

# 或者

cnpm i hexo-butterfly-article-double-row --save

修改站点配置

修改站点根目录下的配置文件 _config.yml

1
2
butterfly_article_double_row:
enable: true

文章三栏

参考:双栏布局首页卡片魔改教程 | Akilarの糖果屋

修改[BlogRoot]\themes\butterfly\layout\includes\mixins\post-ui.pug,整个替换为下面的代码,注意,我这里用的是彩色的图标,每个//- i.fas那里表示我注释了黑白的额图标并换上彩色图标,彩色图标引入的具体方法见之前的教程,这里只需要替换成你自己的图标名字和调节相应的大小即可:

1
2
3
4
5
6
7
8
9
10
11
12
13
14
15
16
17
18
19
20
21
22
23
24
25
26
27
28
29
30
31
32
33
34
35
36
37
38
39
40
41
42
43
44
45
46
47
48
49
50
51
52
53
54
55
56
57
58
59
60
61
62
63
64
65
66
67
68
69
70
71
72
73
74
75
76
77
78
79
80
81
82
83
84
85
86
87
88
89
90
91
92
93
94
95
96
97
98
99
100
101
102
103
104
105
106
107
108
109
110
111
112
113
114
115
116
117
118
119
120
121
122
123
124
125
126
127
128
129
130
131
132
133
134
135
136
137
138
139
140
141
142
143
144
145
146
mixin postUI(posts)
each article , index in page.posts.data
.recent-post-item
-
let link = article.link || article.path
let title = article.title || _p('no_title')
const position = theme.cover.position
let leftOrRight = position === 'both'
? index%2 == 0 ? 'left' : 'right'
: position === 'left' ? 'left' : 'right'
let post_cover = article.cover
let no_cover = article.cover === false || !theme.cover.index_enable ? 'no-cover' : ''
-
.recent-post-content(class=leftOrRight)
.recent-post-cover
img.article-cover(src=url_for(post_cover) onerror=`this.onerror=null;this.src='`+ url_for(theme.error_img.post_page) + `'` alt=title)
.recent-post-info
a.article-title(href=url_for(link) title=title)
.article-title-link= title
.recent-post-meta
.article-meta-wrap
if (is_home() && (article.top || article.sticky > 0))
span.article-meta
//- i.fas.fa-thumbtack.sticky
svg.meta_icon(style="width:16px;height:16px;position:relative;top:3px").post-ui-icon
use(xlink:href='#icon-tuding')
span.sticky= _p('sticky')
span.article-meta-separator |
if (theme.post_meta.page.date_type)
span.post-meta-date
if (theme.post_meta.page.date_type === 'both')
//- i.far.fa-calendar-alt
svg.meta_icon(style="width:21px;height:21px;position:relative;top:6px").post-ui-icon
use(xlink:href='#icon-rili')
span.article-meta-label=_p('post.created')
time.post-meta-date-created(datetime=date_xml(article.date) title=_p('post.created') + ' ' + full_date(article.date))=date(article.date, config.date_format)
span.article-meta-separator |
//- i.fas.fa-history
svg.meta_icon(style="width:13px;height:13px;position:relative;top:2px").post-ui-icon
use(xlink:href='#icon-gengxin1')
span.article-meta-label=_p('post.updated') + " "
time.post-meta-date-updated(datetime=date_xml(article.updated) title=_p('post.updated') + ' ' + full_date(article.updated))=date(article.updated, config.date_format)
else
- let data_type_updated = theme.post_meta.page.date_type === 'updated'
- let date_type = data_type_updated ? 'updated' : 'date'
- let date_icon = data_type_updated ? 'fas fa-history' :'far fa-calendar-alt'
- let date_title = data_type_updated ? _p('post.updated') : _p('post.created')
i(class=date_icon)
span.article-meta-label=date_title
time(datetime=date_xml(article[date_type]) title=date_title + ' ' + full_date(article[date_type]))=date(article[date_type], config.date_format)
if (theme.post_meta.page.categories && article.categories.data.length > 0)
span.article-meta
span.article-meta-separator |
//- i.fas.fa-inbox
svg.meta_icon(style="width:12px;height:12px;position:relative;top:1px").post-ui-icon
use(xlink:href='#icon-fenlei')
each item, index in article.categories.data
a(href=url_for(item.path)).article-meta__categories #[=item.name]
if (index < article.categories.data.length - 1)
i.fas.fa-angle-right.article-meta-link
if (theme.post_meta.page.tags && article.tags.data.length > 0)
span.article-meta.tags
span.article-meta-separator |
//- i.fas.fa-tag
svg.meta_icon(style="width:13px;height:13px;position:relative;top:2px").post-ui-icon
use(xlink:href='#icon-biaoqian')
each item, index in article.tags.data
a(href=url_for(item.path)).article-meta__tags #[=item.name]
if (index < article.tags.data.length - 1)
span.article-meta-link #[=' • ']

mixin countBlockInIndex
- needLoadCountJs = true
span.article-meta
span.article-meta-separator |
//- i.fas.fa-comments
svg.meta_icon(style="width:13px;height:13px;position:relative;top:2px").post-ui-icon
use(xlink:href='#icon-pinglun1')
if block
block
span.article-meta-label= ' ' + _p('card_post_count')

if theme.comments.card_post_count
case theme.comments.use[0]
when 'Disqus'
+countBlockInIndex
a(href=full_url_for(link) + '#disqus_thread')
i.fa-solid.fa-spinner.fa-spin
when 'Disqusjs'
+countBlockInIndex
a(href=full_url_for(link) + '#disqusjs')
span.disqus-comment-count(data-disqus-url=full_url_for(link))
i.fa-solid.fa-spinner.fa-spin
when 'Valine'
+countBlockInIndex
a(href=url_for(link) + '#post-comment')
span.valine-comment-count(data-xid=url_for(link))
i.fa-solid.fa-spinner.fa-spin
when 'Waline'
+countBlockInIndex
a(href=url_for(link) + '#post-comment')
span.waline-comment-count(id=url_for(link))
i.fa-solid.fa-spinner.fa-spin
when 'Twikoo'
+countBlockInIndex
a.twikoo-count(href=url_for(link) + '#post-comment')
i.fa-solid.fa-spinner.fa-spin
when 'Facebook Comments'
+countBlockInIndex
a(href=url_for(link) + '#post-comment')
span.fb-comments-count(data-href=urlNoIndex(article.permalink))
when 'Remark42'
+countBlockInIndex
a(href=url_for(link) + '#post-comment')
span.remark42__counter(data-url=urlNoIndex(article.permalink))
i.fa-solid.fa-spinner.fa-spin
when 'Artalk'
+countBlockInIndex
a(href=url_for(link) + '#post-comment')
span.artalk-count(data-page-key=url_for(link))
i.fa-solid.fa-spinner.fa-spin
a.article-content(href=url_for(link) title=title)
//- Display the article introduction on homepage
case theme.index_post_content.method
when false
- break
when 1
.article-content-text!= article.description
when 2
if article.description
.article-content-text!= article.description
else
- const content = strip_html(article.content)
- let expert = content.substring(0, theme.index_post_content.length)
- content.length > theme.index_post_content.length ? expert += ' ...' : ''
.article-content-text!= expert
default
- const content = strip_html(article.content)
- let expert = content.substring(0, theme.index_post_content.length)
- content.length > theme.index_post_content.length ? expert += ' ...' : ''
.article-content-text!= expert
.recent-post-arrow

if theme.ad && theme.ad.index
if (index + 1) % 3 == 0
.recent-post-item.ads-wrap!=theme.ad.index

样式方案提供两种:

  • 样式一:电脑端宽屏采用滑动卡片,平板宽度采用双栏布局,手机宽度采用单栏卡片
  • 样式二:移除滑动卡片,按屏幕宽度依次应用三栏、双栏、单栏

新建目录[BlogRoot]\themes\butterfly\source\css\_index_card_style\,并在下面新建对应的文件slidecard.stylmulticard.styl并分别填入以下内容,第一个滑动卡片的是店长原版的,我微调一下第二个的样式,大家可以根据自己的选择进行修改:

修改[BlogRoot]\themes\butterfly\source\css\_page\homepage.styl,将整文件内容替换为以下代码:

1
2
3
4
if hexo-config('index_card_style') == 'slidecard'
@import './_index_card_style/slidecard'
else if hexo-config('index_card_style') == 'multicard'
@import './_index_card_style/multicard'

然后在主题配置文件[BlogRoot]\_config.butterfly.yml里新增配置项,这样我们就可以通过配置项自由切换使用哪款了:

1
2
3
# 主页卡片样式
# Docs: https://akilar.top/posts/d6b69c49/
index_card_style: multicard # slidecard | multicard

考虑到不管是样式一还是样式二都存在一个布局突变的情况。为了不至于让首页的文章出现空缺,建议将首页生成的文章数量控制为1,2,3的公倍数。修改站点配置文件[BlogRoot]\_config.yml。找到以下配置项进行调整,注意这是站点配置文件本就有的配置项,不是新增配置项。建议是调整为12篇。如果你的侧边栏魔改内容特别多,那么建议改成18、24、30。务必确保文章卡片栏比侧栏完全展开要长,这样展示效果最好

1
2
3
4
5
6
7
8
# Home page setting
# path: Root path for your blogs index page. (default = '')
# per_page: Posts displayed per page. (0 = disable pagination)
# order_by: Posts order. (Order by date descending by default)
index_generator:
path: ''
per_page: 12
order_by: -date

本教程讨论的卡片都是考虑有封面和有描述的。所以需要保证你已经开启了相应的配置,查看主题配置文件[BlogRoot]\_config.butterfly.yml,找到配置项开启描述栏,建议选择2模式

1
2
3
4
5
6
7
8
# Display the article introduction on homepage
# 1: description
# 2: both (if the description exists, it will show description, or show the auto_excerpt)
# 3: auto_excerpt (default)
# false: do not show the article introduction
index_post_content:
method: 2
length: 500 # if you set method to 2 or 3, the length need to config

友链链接快速添加

友情链接快速添加 | 怕冷爱上雪 (4t.pw)

给hexo butterfly主题友联页面添加一个快速格式按钮,来有效的添加友情链接。

创建js文件

创建/blog/themes/butterfly/source /source/js/kslink.js 写入下面代码

1
2
3
4
5
6
7
8
9
10
11
12
13
14
15
16
17
18
19
20
21
22
23
24
25
26
27
28
29
30
31
32
33
34
35
36
37
38
var leonus = {    
linkCom: e => {
var t = document.querySelector(".el-textarea__inner");
"bf" == e ? (t.value = "```yml\n", t.value += "- name: \n link: \n avatar: \n descr: \n rss: ", t.value += "\n```", t.setSelectionRange(15, 15)) : (t.value = "站点名称:\n站点地址:\n头像链接:\n站点描述:\nRSS地址:", t.setSelectionRange(5, 5)), t.focus()
},
owoBig: () => {
if (!document.getElementById("post-comment") || document.body.clientWidth < 768) return;
let e = 1,
t = "",
o = document.createElement("div"),
n = document.querySelector("body");
o.id = "owo-big", n.appendChild(o), new MutationObserver((l => {
for (let a = 0; a < l.length; a++) {
let i = l[a].addedNodes,
s = "";
if (2 == i.length && "OwO-body" == i[1].className) s = i[1];
else {
if (1 != i.length || "tk-comment" != i[0].className) continue;
s = i[0]
}
s.onmouseover = l => {
e && ("OwO-body" == s.className && "IMG" == l.target.tagName || "tk-owo-emotion" == l.target.className) && (e = 0, t = setTimeout((() => {
let e = 3 * l.path[0].clientHeight,
t = 3 * l.path[0].clientWidth,
a = l.x - l.offsetX - (t - l.path[0].clientWidth) / 2,
i = l.y - l.offsetY;
a + t > n.clientWidth && (a -= a + t - n.clientWidth + 10), a < 0 && (a = 10), o.style.cssText = `display:flex; height:${e}px; width:${t}px; left:${a}px; top:${i}px;`, o.innerHTML = `<img src="${l.target.src}">`
}), 300))
}, s.onmouseout = () => {
o.style.display = "none", e = 1, clearTimeout(t)
}
}
})).observe(document.getElementById("post-comment"), {
subtree: !0,
childList: !0
})
},
};

注意这里的 var t = document.querySelector(".el-textarea__inner");里的.el-textarea__inner要为你自己评论框里的class名称或者id;

创建css文件

创建/blog/themes/butterfly/source /source/css/kslink.css 写入下面代码

1
2
3
4
5
6
7
8
9
10
11
12
13
14
15
16
17
18
19
20
21
22
23
24
25
26
27
28
29
30
31
32
33
34
35
36
37
/* 快速填写格式 */
.addBtn {
display: flex;
justify-content: center;
flex-wrap: wrap;
}
.addBtn button {
transtion: .2s;
display: flex;
margin: 5px auto;
color: var(--global-bg);
padding: 15px;
border-radius: 12px;
background: var(--search-result-title);
align-items: center;
}

button {
padding: 0;
outline: 0;
border: none;
background: 0 0;
cursor: pointer;
touch-action: manipulation;
}
.fa-solid, .fas {
font-family: "Font Awesome 6 Free";
font-weight: 900;
}
.addBtn i {
font-size: 1.3rem;
margin-right: 10px;
}
.addBtn button:hover {
background: #4b7aff;
color: #fff;
}

配置引入css和js

\source\link\index.md 相应位置插入以下代码

为了避免其他页面加载css和js文件可以直接插入文章md文件内避免印象加载速度。

1
2
3
4
5
6
<div class="addBtn">
<button onclick="leonus.linkCom()"><i class="fa-solid fa-circle-plus"></i>快速申请 (默认样式)</button>
<button onclick="leonus.linkCom(&quot;bf&quot;)"><i class="fa-solid fa-circle-plus"></i>快速申请 (Butterfly)</button>
</div>
<link rel="stylesheet" href="/css/kslink.css">
<script src="/js/kslink.js"></script>

顶栏常驻

butterfly的顶栏滚动时会自动收起,我并不喜欢,所以通过修改css的方式实现。

1
2
3
4
5
6
7
8
9
10
11
12
13
14
.nav-fixed #nav{
transform: translateY(58px)!important;
-webkit-transform: translateY(58px)!important;
-moz-transform: translateY(58px)!important;
-ms-transform: translateY(58px)!important;
-o-transform: translateY(58px)!important;
}
#nav{
transition: none!important;
-webkit-transition: none!important;
-moz-transition: none!important;
-ms-transition: none!important;
-o-transition: none!important;
}

使用阿里矢量图标库

Butterfly主题配置,如何使用阿里矢量图标库,可以自定义图标大小 | 椰罗森海 (yeooe.cn)

注册iconfont并配置字体图标

新建项目之后,将图标添加到自己的项目中

image-20240126174606531

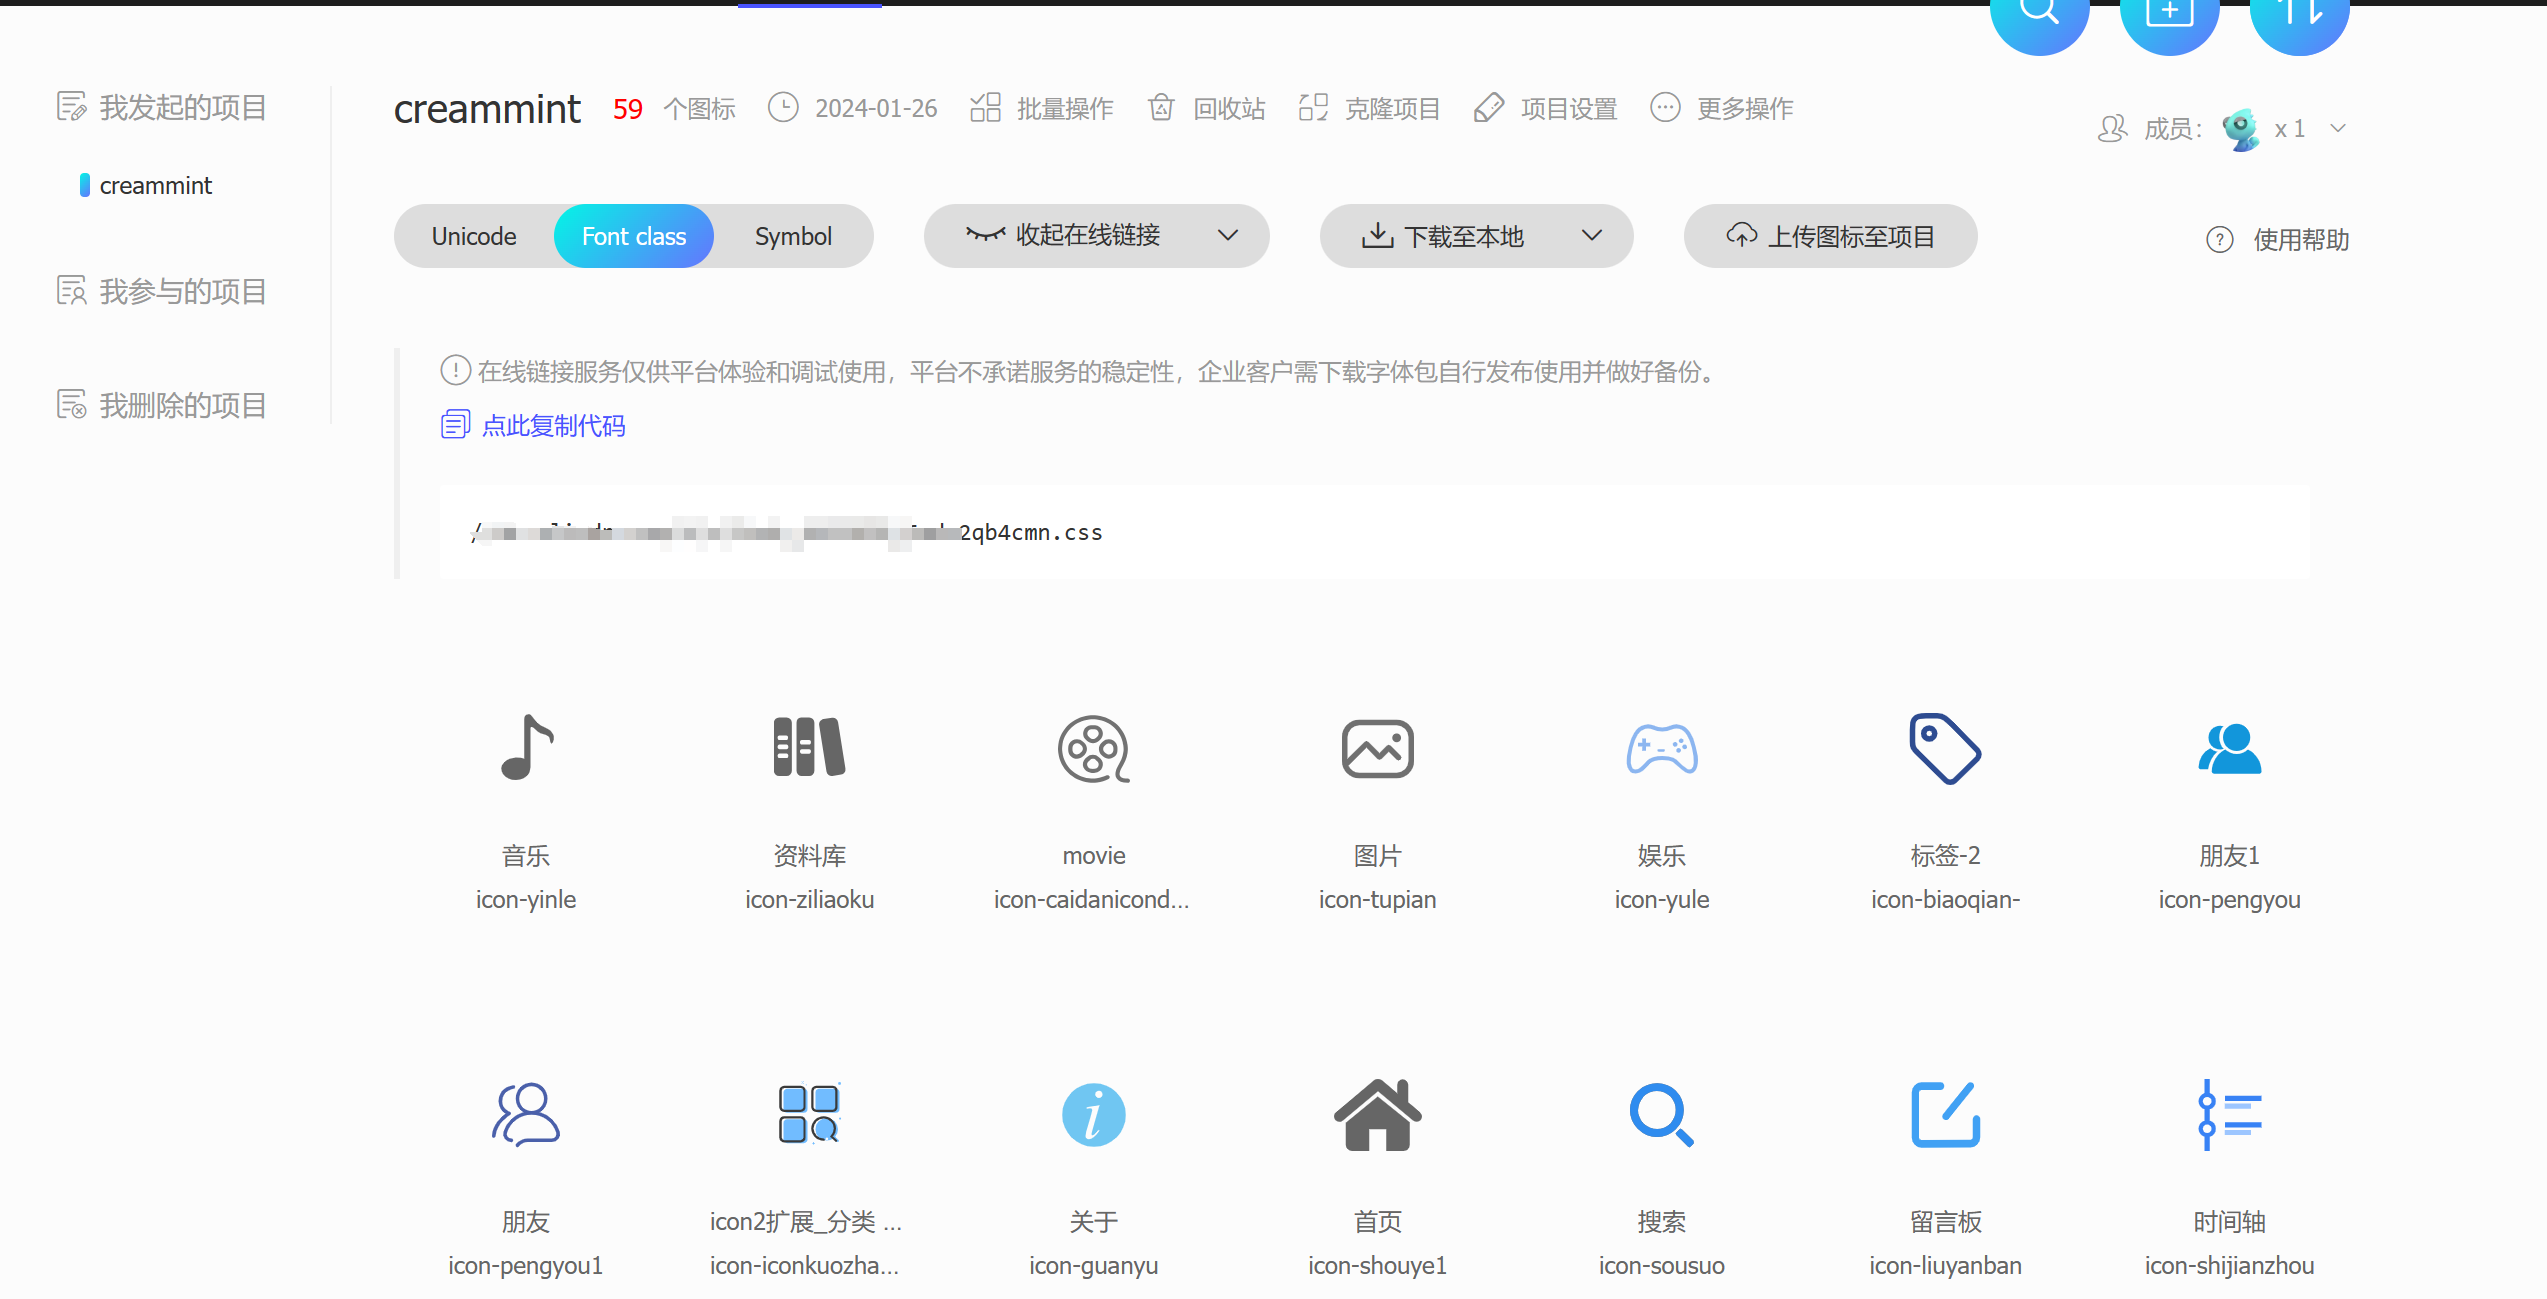
点击Font class中的链接,复制下来
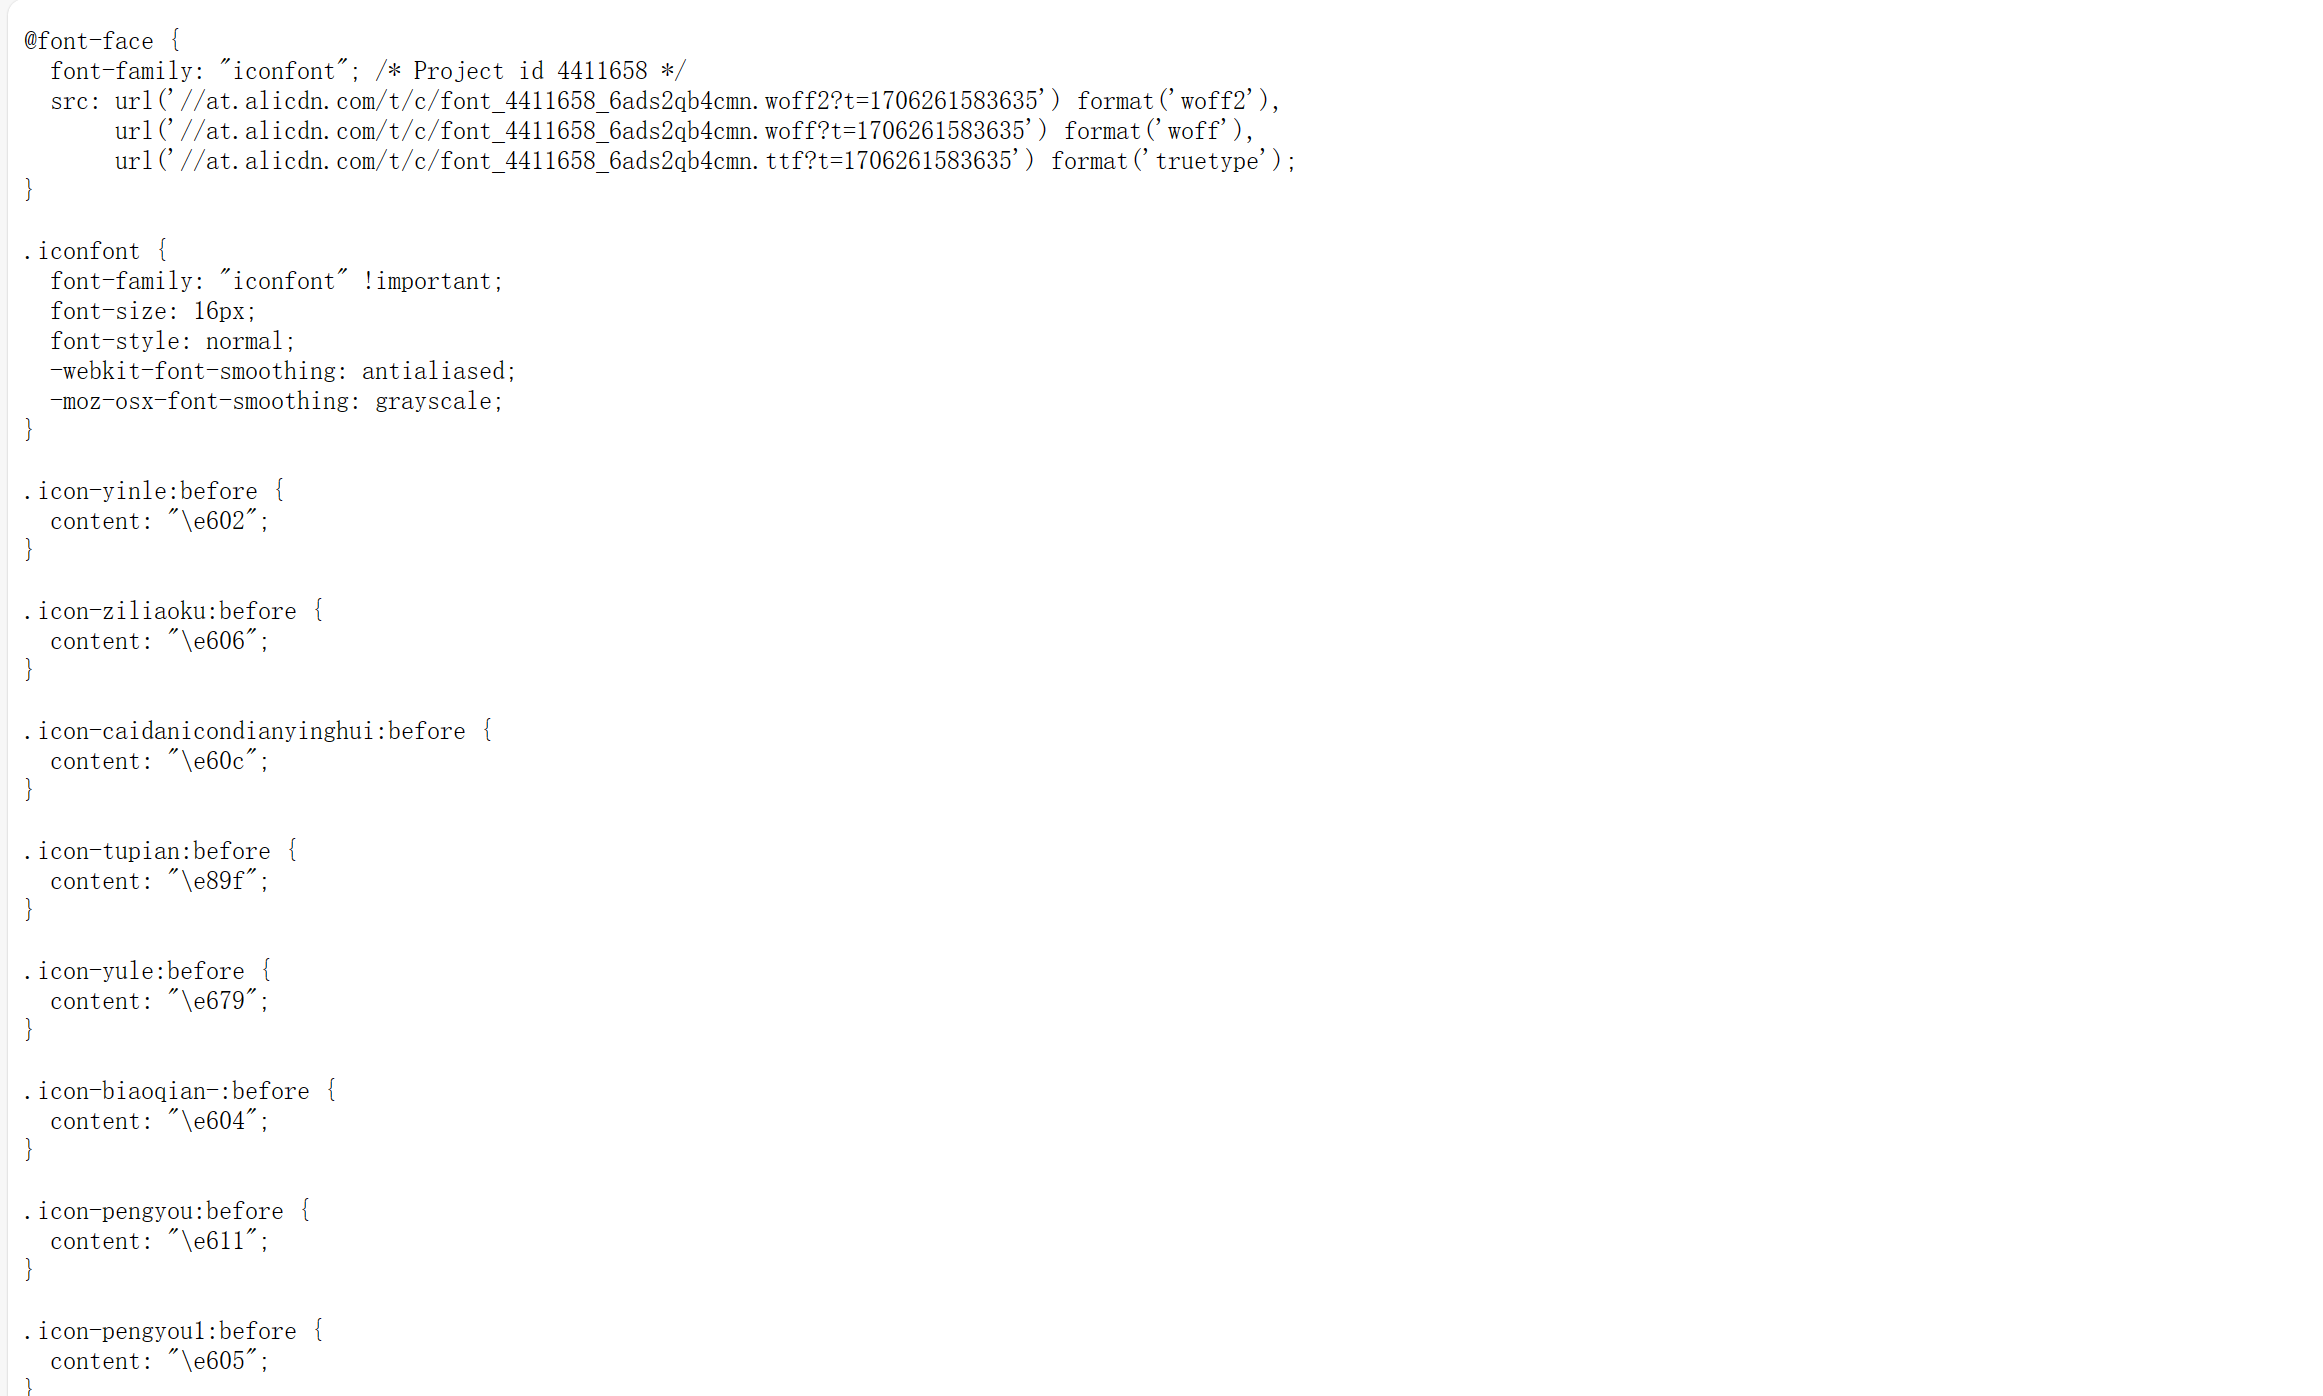
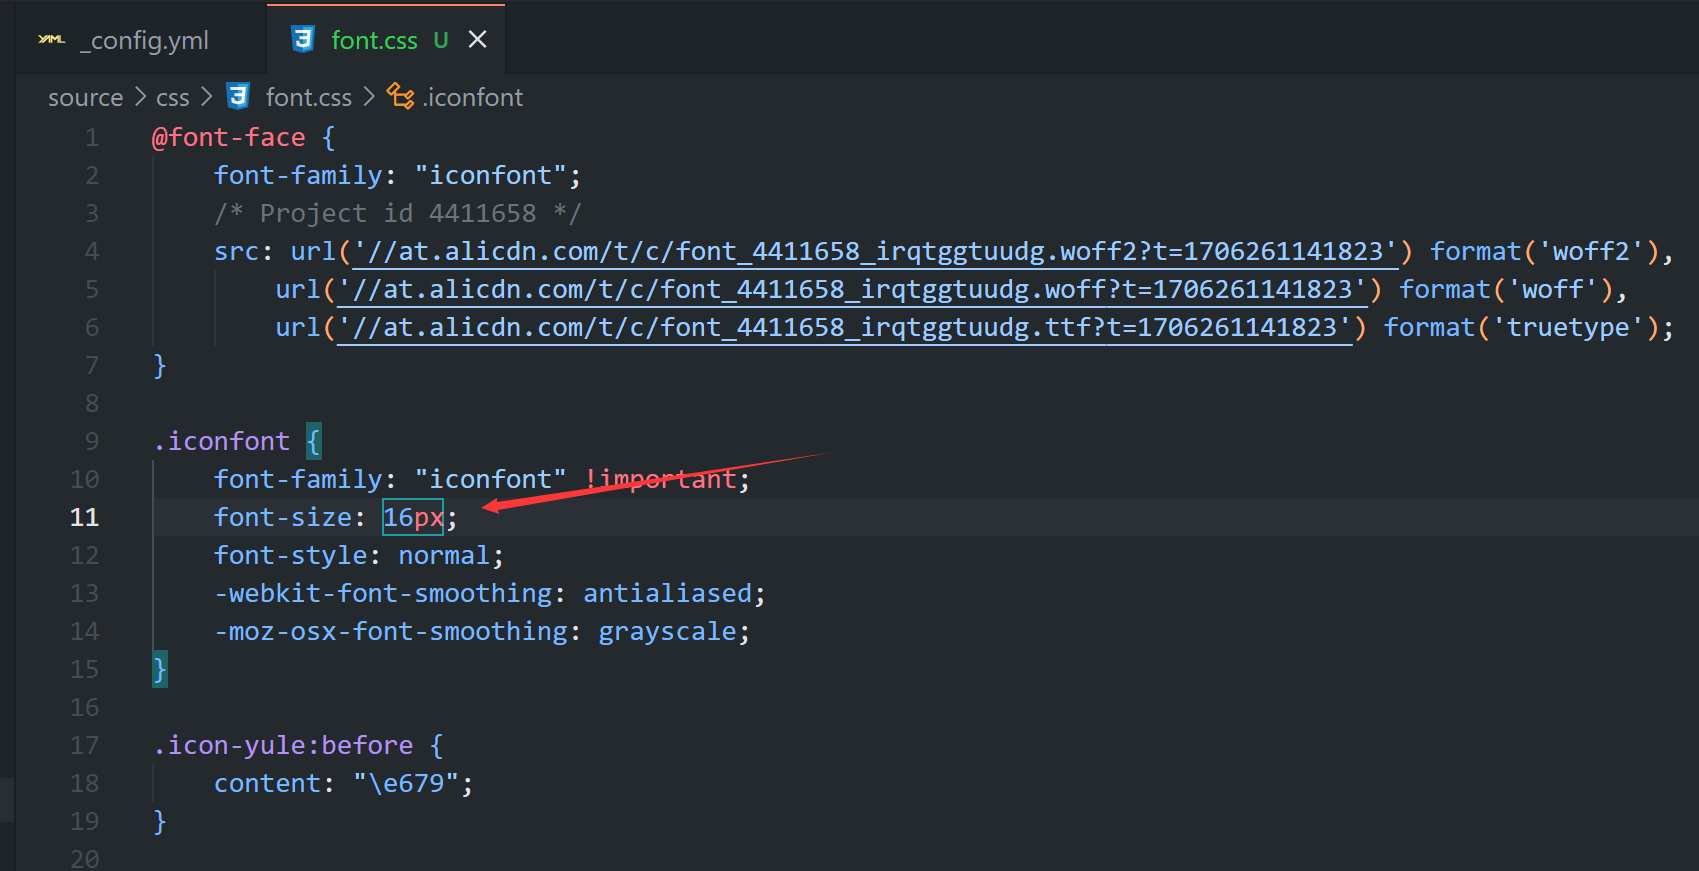
image-20240126174632478

新建font.css文件

在/source目录下新建文件夹 source/css,新建文件font.css,然后将刚刚复制的代码粘贴进去

image-20240126174655862

image-20240126174734700

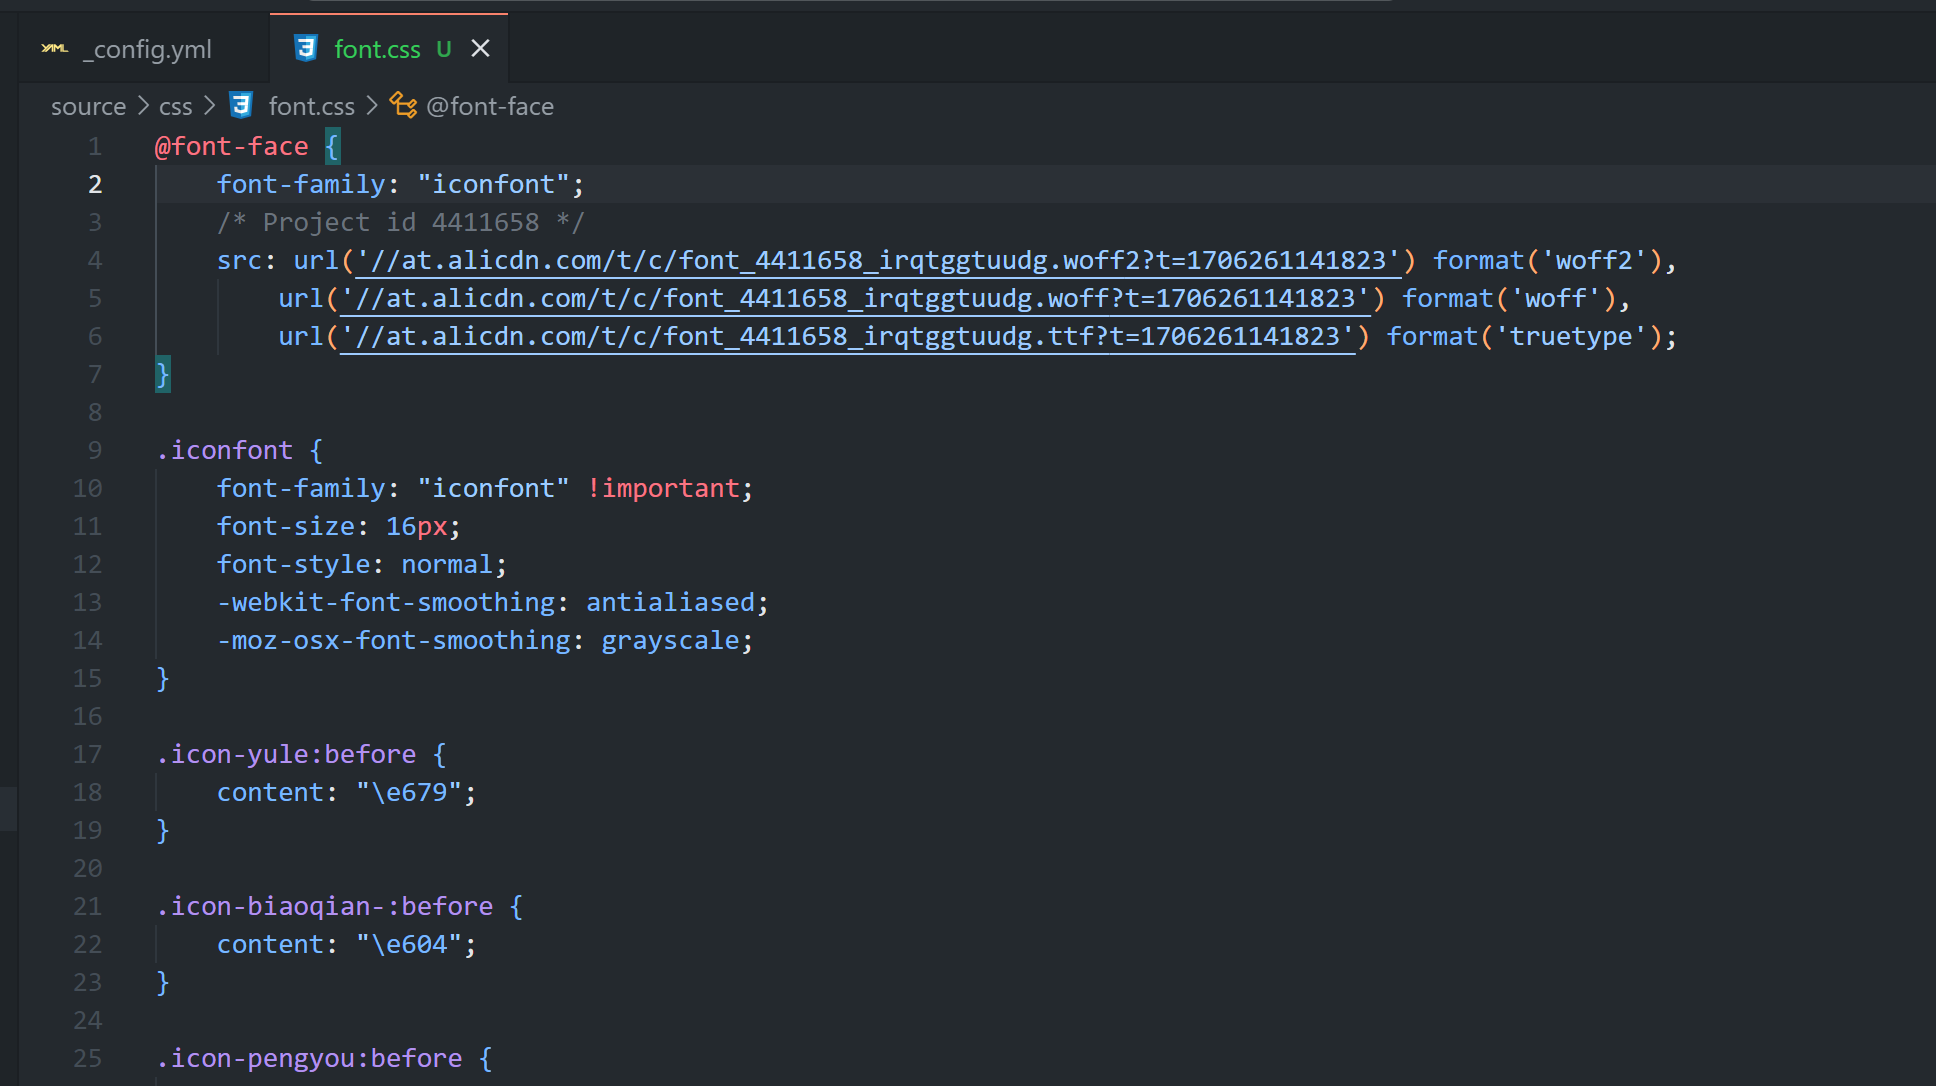
修改_config.butterfly.yml文件中的inject

在_config.butterfly.yml文件中找到inject,按如图所示设置

image-20240126174800600

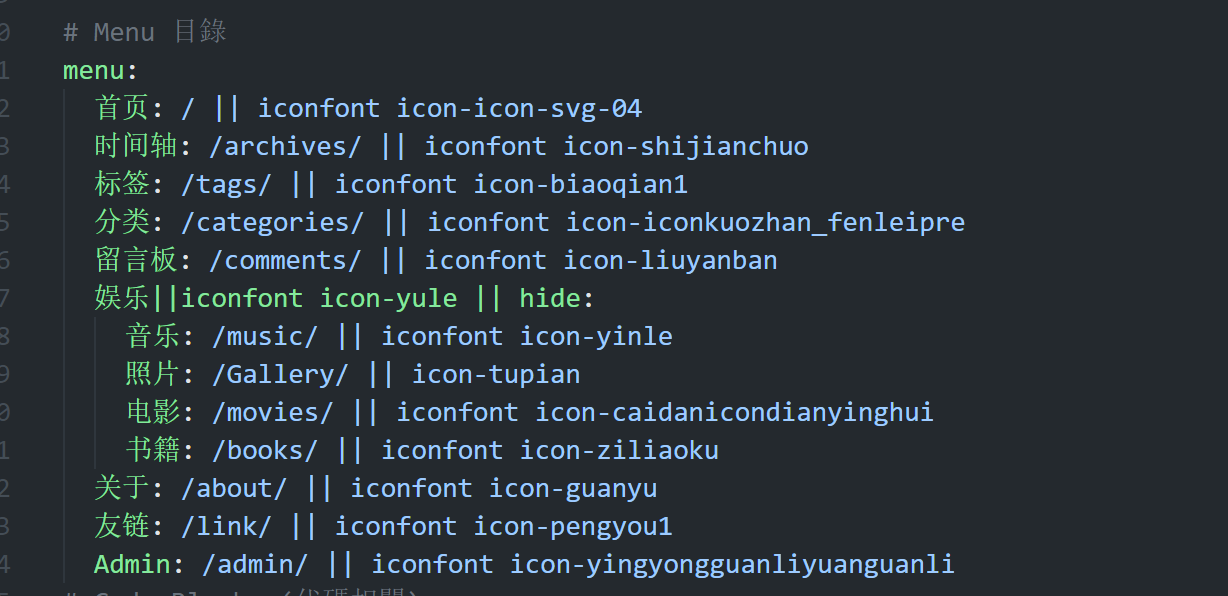
引用格式 iconfont icon名字,如图所示

image-20240126174850727

至此图标已经可以正常显示

修改字体图标大小

如果觉得显示效果偏小,可以修改font.css文件里的font-size属性,默认是16px,改成22px,然后看下效果

Hexo Butterfly宽屏适配指北

Hexo Butterfly宽屏适配指北 | Ariasakaの小窝 (yisous.xyz)

星空背景和流星特效

[BlogRoot]/source/js目录下新建universe.js,输入以下代码:

1
2
function dark() {window.requestAnimationFrame=window.requestAnimationFrame||window.mozRequestAnimationFrame||window.webkitRequestAnimationFrame||window.msRequestAnimationFrame;var n,e,i,h,t=.05,s=document.getElementById("universe"),o=!0,a="180,184,240",r="226,225,142",d="226,225,224",c=[];function f(){n=window.innerWidth,e=window.innerHeight,i=.216*n,s.setAttribute("width",n),s.setAttribute("height",e)}function u(){h.clearRect(0,0,n,e);for(var t=c.length,i=0;i<t;i++){var s=c[i];s.move(),s.fadeIn(),s.fadeOut(),s.draw()}}function y(){this.reset=function(){this.giant=m(3),this.comet=!this.giant&&!o&&m(10),this.x=l(0,n-10),this.y=l(0,e),this.r=l(1.1,2.6),this.dx=l(t,6*t)+(this.comet+1-1)*t*l(50,120)+2*t,this.dy=-l(t,6*t)-(this.comet+1-1)*t*l(50,120),this.fadingOut=null,this.fadingIn=!0,this.opacity=0,this.opacityTresh=l(.2,1-.4*(this.comet+1-1)),this.do=l(5e-4,.002)+.001*(this.comet+1-1)},this.fadeIn=function(){this.fadingIn&&(this.fadingIn=!(this.opacity>this.opacityTresh),this.opacity+=this.do)},this.fadeOut=function(){this.fadingOut&&(this.fadingOut=!(this.opacity<0),this.opacity-=this.do/2,(this.x>n||this.y<0)&&(this.fadingOut=!1,this.reset()))},this.draw=function(){if(h.beginPath(),this.giant)h.fillStyle="rgba("+a+","+this.opacity+")",h.arc(this.x,this.y,2,0,2*Math.PI,!1);else if(this.comet){h.fillStyle="rgba("+d+","+this.opacity+")",h.arc(this.x,this.y,1.5,0,2*Math.PI,!1);for(var t=0;t<30;t++)h.fillStyle="rgba("+d+","+(this.opacity-this.opacity/20*t)+")",h.rect(this.x-this.dx/4*t,this.y-this.dy/4*t-2,2,2),h.fill()}else h.fillStyle="rgba("+r+","+this.opacity+")",h.rect(this.x,this.y,this.r,this.r);h.closePath(),h.fill()},this.move=function(){this.x+=this.dx,this.y+=this.dy,!1===this.fadingOut&&this.reset(),(this.x>n-n/4||this.y<0)&&(this.fadingOut=!0)},setTimeout(function(){o=!1},50)}function m(t){return Math.floor(1e3*Math.random())+1<10*t}function l(t,i){return Math.random()*(i-t)+t}f(),window.addEventListener("resize",f,!1),function(){h=s.getContext("2d");for(var t=0;t<i;t++)c[t]=new y,c[t].reset();u()}(),function t(){document.getElementsByTagName('html')[0].getAttribute('data-theme')=='dark'&&u(),window.requestAnimationFrame(t)}()};
dark()

[BlogRoot]/source/css目录下新建universe.css,输入以下代码:

1
2
3
4
5
6
7
8
9
10
11
12
13
14
15
16
/* 背景宇宙星光  */
#universe{
display: block;
position: fixed;
margin: 0;
padding: 0;
border: 0;
outline: 0;
left: 0;
top: 0;
width: 100%;
height: 100%;
pointer-events: none;
/* 这个是调置顶的优先级的,-1在文章页下面,背景上面,个人推荐这种 */
z-index: -1;
}

在主题配置文件_config.butterfly.ymlinject配置项中bottom下填入:

1
2
3
4
inject:
bottom:
- <canvas id="universe"></canvas>
- <script defer src="/js/universe.js"></script>

在主题配置文件_config.butterfly.ymlinject配置项中head下填入:

1
2
3
inject:
head:
- <link rel="stylesheet" href="/css/universe.css">

重新编译即可看到效果。

听话的鼠标魔改

  1. 新建文件[BlogRoot]\source\js\cursor.js,在里面写上如下代码:

    1
    2
    3
    4
    5
    6
    7
    8
    9
    10
    11
    12
    13
    14
    15
    16
    17
    18
    19
    20
    21
    22
    23
    24
    25
    26
    27
    28
    29
    30
    31
    32
    33
    34
    35
    36
    37
    38
    39
    40
    41
    42
    43
    44
    45
    46
    47
    48
    49
    50
    51
    52
    53
    54
    55
    56
    57
    58
    59
    60
    61
    62
    63
    64
    65
    66
    67
    68
    69
    70
    71
    72
    73
    74
    75
    76
    77
    78
    79
    80
    81
    82
    83
    var CURSOR;

    Math.lerp = (a, b, n) => (1 - n) * a + n * b;

    const getStyle = (el, attr) => {
    try {
    return window.getComputedStyle
    ? window.getComputedStyle(el)[attr]
    : el.currentStyle[attr];
    } catch (e) {}
    return "";
    };

    class Cursor {
    constructor() {
    this.pos = {curr: null, prev: null};
    this.pt = [];
    this.create();
    this.init();
    this.render();
    }

    move(left, top) {
    this.cursor.style["left"] = `${left}px`;
    this.cursor.style["top"] = `${top}px`;
    }

    create() {
    if (!this.cursor) {
    this.cursor = document.createElement("div");
    this.cursor.id = "cursor";
    this.cursor.classList.add("hidden");
    document.body.append(this.cursor);
    }

    var el = document.getElementsByTagName('*');
    for (let i = 0; i < el.length; i++)
    if (getStyle(el[i], "cursor") == "pointer")
    this.pt.push(el[i].outerHTML);

    document.body.appendChild((this.scr = document.createElement("style")));
    // 这里改变鼠标指针的颜色 由svg生成
    this.scr.innerHTML = `* {cursor: url("data:image/svg+xml,<svg xmlns='http://www.w3.org/2000/svg' viewBox='0 0 8 8' width='8px' height='8px'><circle cx='4' cy='4' r='4' opacity='.5'/></svg>") 4 4, auto}`;
    }

    refresh() {
    this.scr.remove();
    this.cursor.classList.remove("hover");
    this.cursor.classList.remove("active");
    this.pos = {curr: null, prev: null};
    this.pt = [];

    this.create();
    this.init();
    this.render();
    }

    init() {
    document.onmouseover = e => this.pt.includes(e.target.outerHTML) && this.cursor.classList.add("hover");
    document.onmouseout = e => this.pt.includes(e.target.outerHTML) && this.cursor.classList.remove("hover");
    document.onmousemove = e => {(this.pos.curr == null) && this.move(e.clientX - 8, e.clientY - 8); this.pos.curr = {x: e.clientX - 8, y: e.clientY - 8}; this.cursor.classList.remove("hidden");};
    document.onmouseenter = e => this.cursor.classList.remove("hidden");
    document.onmouseleave = e => this.cursor.classList.add("hidden");
    document.onmousedown = e => this.cursor.classList.add("active");
    document.onmouseup = e => this.cursor.classList.remove("active");
    }

    render() {
    if (this.pos.prev) {
    this.pos.prev.x = Math.lerp(this.pos.prev.x, this.pos.curr.x, 0.15);
    this.pos.prev.y = Math.lerp(this.pos.prev.y, this.pos.curr.y, 0.15);
    this.move(this.pos.prev.x, this.pos.prev.y);
    } else {
    this.pos.prev = this.pos.curr;
    }
    requestAnimationFrame(() => this.render());
    }
    }

    (() => {
    CURSOR = new Cursor();
    // 需要重新获取列表时,使用 CURSOR.refresh()
    })();

    其中比较重要的参数就是鼠标的尺寸和颜色,已经在上图中标出,目前发现颜色只支持RGB写法和固有名称写法(例如red这种),其他参数也可以自行摸索:

    1
    * {cursor: url("data:image/svg+xml,<svg xmlns='http://www.w3.org/2000/svg' viewBox='0 0 8 8' width='8px' height='8px'><circle cx='4' cy='4' r='4' opacity='1.0' fill='rgb(57, 197, 187)'/></svg>") 4 4, auto}`
  2. [BlogRoot]\source\css\custom.css添加如下代码:

    1
    2
    3
    4
    5
    6
    7
    8
    9
    10
    11
    12
    13
    14
    15
    16
    17
    18
    19
    20
    21
    22
    23
    24
    25
    26
    27
    28
    29
    30
    31
    32
    33
    34
    35
    36
    /* 鼠标样式 */
    #cursor {
    position: fixed;
    width: 16px;
    height: 16px;
    /* 这里改变跟随的底色 */
    background: var(--theme-color);
    border-radius: 8px;
    opacity: 0.25;
    z-index: 10086;
    pointer-events: none;
    transition: 0.2s ease-in-out;
    transition-property: background, opacity, transform;
    }

    #cursor.hidden {
    opacity: 0;
    }

    #cursor.hover {
    opacity: 0.1;
    transform: scale(2.5);
    -webkit-transform: scale(2.5);
    -moz-transform: scale(2.5);
    -ms-transform: scale(2.5);
    -o-transform: scale(2.5);
    }

    #cursor.active {
    opacity: 0.5;
    transform: scale(0.5);
    -webkit-transform: scale(0.5);
    -moz-transform: scale(0.5);
    -ms-transform: scale(0.5);
    -o-transform: scale(0.5);
    }

    这里比较重要的参数就是鼠标跟随的圆形颜色,可以根据自己的喜好进行更改:

    1
    2
    3
    4
    #cursor {
    /* 这里改变跟随的底色 */
    background: rgb(57, 197, 187);
    }
  3. 在主题配置文件_config.butterfly.yml文件的inject配置项引入刚刚创建的css文件和js文件:

    1
    2
    3
    4
    5
    inject: 
    head:
    + - <link rel="stylesheet" href="/css/custom.css">
    bottom:
    + - <script defer src="/js/cursor.js"></script>
  4. 重启项目即可看见效果:

    1
    hexo cl; hexo s

右边按钮阅读进度(Leonus)

  1. 修改文件[BlogRoot]\themes\butterfly\layout\includes\rightside.pug,在最下面插入如下两行代码(注意去掉前面的+号,别傻呼呼的直接复制粘贴)

    1
    2
    3
    4
    button#go-up(type="button" title=_p("rightside.back_to_top"))
    i.fas.fa-arrow-up
    + span#percent 0
    + span %
  2. 新建文件[BlogRoot]\source\js\readPercent.js,在自定义js文件中加入如下代码:

    1
    2
    3
    4
    5
    6
    7
    8
    9
    10
    11
    12
    13
    14
    15
    16
    17
    window.onscroll = percent;// 执行函数
    // 页面百分比
    function percent() {
    let a = document.documentElement.scrollTop || window.pageYOffset, // 卷去高度
    b = Math.max(document.body.scrollHeight, document.documentElement.scrollHeight, document.body.offsetHeight, document.documentElement.offsetHeight, document.body.clientHeight, document.documentElement.clientHeight) - document.documentElement.clientHeight, // 整个网页高度
    result = Math.round(a / b * 100), // 计算百分比
    up = document.querySelector("#go-up") // 获取按钮

    if (result <= 95) {
    up.childNodes[0].style.display = 'none'
    up.childNodes[1].style.display = 'block'
    up.childNodes[1].innerHTML = result;
    } else {
    up.childNodes[1].style.display = 'none'
    up.childNodes[0].style.display = 'block'
    }
    }
  3. 创建css文件[BlogRoot]\source\css\readPercent.css写入如下代码:

    1
    2
    3
    4
    5
    6
    7
    8
    9
    10
    11
    12
    13
    14
    15
    16
    17
    18
    19
    20
    21
    /* 返回顶部 */

    button#go-up #percent {
    display: none;
    font-weight: bold;
    font-size: 15px !important;
    }

    button#go-up span {
    font-size: 12px!important;
    margin-right: -1px;
    }

    /* 鼠标滑动到按钮上时显示返回顶部图标 */
    button#go-up:hover i {
    display: block !important;
    }

    button#go-up:hover #percent {
    display: none !important;
    }
  4. 引入js文件与css文件

    1
    2
    3
    4
    5
    inject:
    head:
    + - <link rel="stylesheet" href="/css/readPercent.css">
    bottom:
    + - <script defer data-pjax src="/js/readPercent.js"></script>
  5. 重启项目即可看到效果

    1
    hexo cl; hexo s

直达底部按钮

[BlogRoot]\themes\butterfly\layout\includes\rightside.pug做以下修改:

1
2
3
4
5
button#go-up(type="button" title=_p("rightside.back_to_top"))
i.fas.fa-arrow-up

+button#go-down(type="button" title="直达底部" onclick="btf.scrollToDest(document.body.scrollHeight, 500)")
+ i.fas.fa-arrow-down

Vue+Element样式弹窗

  1. 在主题配置文件[BlogRoot]\_config.butterfly.yml中 引入VueElement相关依赖:

    1
    2
    3
    4
    5
    6
    inject:
    head:
    + - <link rel="stylesheet" href="https://cdn1.tianli0.top/npm/element-ui@2.15.6/packages/theme-chalk/lib/index.css"> # 引入组件库(f12)
    bottom:
    + - <script async src="https://cdn1.tianli0.top/npm/vue@2.6.14/dist/vue.min.js"></script> # 引入VUE(f12)
    + - <script async src="https://cdn1.tianli0.top/npm/element-ui@2.15.6/lib/index.js"></script> # 引入ElementUI(f12)
  2. 在你想要弹出弹窗的js代码中加入如下代码即可触发弹窗:

    1
    2
    3
    4
    5
    6
    7
    8
    9
    10
    11
    12
    13
    new Vue({
    data: function () {
    this.$notify({
    title: "你已被发现😜",
    message: "小伙子,扒源记住要遵循GPL协议!",
    position: 'top-left',
    offset: 50,
    showClose: true,
    type: "warning",
    duration: 5000
    });
    }
    })
    • notify:弹窗类型,可以替换为message(信息提示)和confirm(二次确认提示)

    • title:弹窗标题,可以改为自定义标题

    • message:弹窗信息,可以改为自定义内容

    • position:弹出位置,bottom、top和left、right两两组合

    • offset:偏移量,简单可以理解为与边界的距离

    • showClose:是否显示关闭按钮

    • type:提示类型,可选success/warning/info/error等

    • duration:停留时间,弹出停留至消失的时间,单位ms

      详见:Vue中常用的提示信息

按键防抖

我们的博客按钮非常多,可能你平时并不在意,如果你为f12按钮绑定了一个弹窗,那当你长按f12可能会无限触发弹窗,这就是没有做按键防抖的后果,我们的是静态博客,所以只消耗本地的资源,如果是有后端服务的,频繁触发某个逻辑可能会消耗服务器资源,因此我们必须在前端过滤这些非法操作,不能让其跑到后端!我这里用的是最初等的计时器对象来防抖,原理就是延迟某个时间再触发逻辑(例如300ms),如果这段时间内按键再次按下直接忽略。

  1. 在任意一个js文件引入以下代码,这个js文件的引入最好在前面,否则可能不能及时生效

    1
    2
    3
    4
    5
    6
    7
    // 防抖全局计时器
    let TT = null; //time用来控制事件的触发
    // 防抖函数:fn->逻辑 time->防抖时间
    function debounce(fn, time) {
    if (TT !== null) clearTimeout(TT);
    TT = setTimeout(fn, time);
    }
  2. 将你需要防抖的函数fn()debounce(fn, 300)替代,防抖时间可以自定义,单位为ms,下面就是一个例子

    1
    2
    3
    4
    5
    6
    7
    8
    9
    10
    11
    12
    13
    14
    15
    16
    17
    18
    // 复制提醒
    document.addEventListener("copy", function () {
    debounce(function () {
    new Vue({
    data: function () {
    this.$notify({
    title: "哎嘿!复制成功🍬",
    message: "若要转载最好保留原文链接哦,给你一个大大的赞!",
    position: 'top-left',
    offset: 50,
    showClose: true,
    type: "success",
    duration: 5000
    });
    }
    })
    }, 300);
    })
  3. 在主题配置文件引入以上js文件,具体过程略。这样写全局都是用一个计时器,考虑到我们的博客较为简单,这样做实测是没啥问题了,再也不怕手抖了!

分享链接按钮

注意:分享按钮提醒依赖Vue弹窗和防抖计时器,请完成前面的前置教程!

  1. 引入ClipboardJS依赖:在主题配置文件[BlogRoot]\_config.butterfly.yml

    1
    2
    3
    inject:
    bottom:
    + - <script src="https://cdn.bootcdn.net/ajax/libs/clipboard.js/2.0.11/clipboard.min.js"></script>
  2. 添加分享按钮,在[BlogRoot]\themes\butterfly\layout\includes\rightside.pug做以下修改:

    1
    2
    3
    4
    5
    6
    7
    8
    9
    +      when 'share'
    + button.share(type="button" title='分享链接' onclick="share()")
    + i.fas.fa-share-nodes

    #rightside
    - const { enable, hide, show } = theme.rightside_item_order
    - const hideArray = enable ? hide && hide.split(',') : ['readmode','translate','darkmode']
    - - const showArray = enable ? show && show.split(',') : ['chat','comment','hideAside','toc']
    + - const showArray = enable ? show && show.split(',') : ['chat','share','comment','hideAside','toc']
  3. 新建文件[BlogRoot]\source\js\share.js,写入如下代码(再说一次,记住完成前置教程!!!):

    1
    2
    3
    4
    5
    6
    7
    8
    9
    10
    11
    12
    13
    14
    15
    16
    17
    18
    19
    20
    21
    22
    23
    24
    25
    26
    27
    28
    29
    30
    31
    32
    33
    // 分享本页
    function share_() {
    let url = window.location.origin + window.location.pathname
    try {
    // 截取标题
    var title = document.title;
    var subTitle = title.endsWith("|Cream薄荷糖") ? title.substring(0, title.length - 14) : title;
    navigator.clipboard.writeText('Cream薄荷糖的站内分享\n标题:' + subTitle + '\n链接:' + url + '\n欢迎来访!🍭🍭🍭');
    new Vue({
    data: function () {
    this.$notify({
    title: "成功复制分享信息🎉",
    message: "您现在可以通过粘贴直接跟小伙伴分享了!",
    position: 'top-left',
    offset: 50,
    showClose: true,
    type: "success",
    duration: 5000
    });
    // return { visible: false }
    }
    })
    } catch (err) {
    console.error('复制失败!', err);
    }
    // new ClipboardJS(".share", { text: function () { return '标题:' + document.title + '\n链接:' + url } });
    // btf.snackbarShow("本页链接已复制到剪切板,快去分享吧~")
    }

    // 防抖
    function share() {
    debounce(share_, 300);
    }

    这里我的页面名字截取了后面的重复段,你要截取的话就将| Fomalhaut🥝换成| 你的网站名字,或者保留也行,就是直接复制!

  4. 在主题配置文件[BlogRoot]\_config.butterfly.yml中引入该js文件

    1
    2
    3
    inject:
    bottom:
    + - <script src="/js/share.js"></script>
  5. 清理并重启项目即可看到变更

    1
    hexo cl; hexo s

文章加密插件

详见开源地址:hexo-blog-encrypt

  1. 在根目录执行以下命令

    1
    npm install --save hexo-blog-encrypt
  2. Front matter配置方法

    1
    2
    3
    4
    5
    6
    7
    8
    9
    10
    11
    12
    ---
    title: Hello World
    tags:
    - 作为日记加密
    date: 2016-03-30 21:12:21
    password: mikemessi
    abstract: 有东西被加密了, 请输入密码查看.
    message: 您好, 这里需要密码.
    theme: xray
    wrong_pass_message: 抱歉, 这个密码看着不太对, 请再试试.
    wrong_hash_message: 抱歉, 这个文章不能被校验, 不过您还是能看看解密后的内容.
    ---
  3. 配置文件[BlogRoot]\_config.yml中针对tags的加密

    1
    2
    3
    4
    5
    6
    7
    8
    9
    10
    # Security
    encrypt: # hexo-blog-encrypt
    abstract: 有东西被加密了, 请输入密码查看.
    message: 您好, 这里需要密码.
    tags:
    - {name: tagName, password: 密码A}
    - {name: tagName, password: 密码B}
    theme: xray
    wrong_pass_message: 抱歉, 这个密码看着不太对, 请再试试.
    wrong_hash_message: 抱歉, 这个文章不能被校验, 不过您还是能看看解密后的内容.
  4. 你可以在线挑选你喜欢的主题,并应用到你的博客中:

  5. 重启项目进入对应的文章页面即可看到加密效果

    1
    hexo cl; hexo s