Hexo增加Valine评论系统
前言
点开查看参考教程
Hexo 博客支持的评论系统其实有很多,本站选用了 Valine,选择原因:轻量级、访问速度快、配置过程简单,以上三个原因足够我选择它了。
Valine 评论系统的配置其实很简单,在这里就简单介绍一下。
操作流程
注册帐号
在LeanCloud官网LeanCloud 免费注册一个帐号,注册后需要实名认证即可使用不同的服务了。创建应用
- 点击左上角LeanCloud后选择创建应用
- 填写应用名称
- 默认选择开发版
- 自行选择是否填写应用描述
- 最后点击创建按钮
修改配置
打开
_config.butterfly.yml配置,找到 valine 配置,修改appid和appkey1
2
3
4
5
6
7
8
9
10
11
12# valine
# https://valine.js.org
valine:
appId: 请在这里填写你的appId # leancloud application app id
appKey: 请在这里填写你的appKey # leancloud application app key
avatar: monsterid # gravatar style https://valine.js.org/#/avatar
serverURLs: # This configuration is suitable for domestic custom domain name users, overseas version will be automatically detected (no need to manually fill in)
bg: # valine background
visitor: false
placeholder: "嘿,别忘了留下你的小脚印哦!" # 评论框的默认填充
pageSize: 10 #每一页显示的评论条数
option:同时修改选择的评论系统为
Valine即可1
2
3
4
5
6
7
8
9
10comments:
# Up to two comments system, the first will be shown as default
# Choose: Disqus/Disqusjs/Livere/Gitalk/Valine/Waline/Utterances/Facebook Comments/Twikoo/Giscus/Remark42/Artalk
use: Valine # 请在这里选择你的评论系统类型:Valine,Disqus
text: true # Display the comment name next to the button
# lazyload: The comment system will be load when comment element enters the browser's viewport.
# If you set it to true, the comment count will be invalid
lazyload: false
count: false # Display comment count in post's top_img
card_post_count: false # Display comment count in Home Page重新生成博客系统即可看到效果
1
2
3hexo cl
hexo g
hexo s
评论页面美化
配置 LeanCloud(因为某些原因需要绑定域名才能使用)并获取 appID 和 appKey: 具体参照 valine 文档。
填写主题配置文件相应项:
1
2
3
4
5
6
7
8
9
10
11
12
13
14valine:
appId: # leancloud application app id
appKey: # leancloud application app key
pageSize: 10 # comment list page size
avatar: monsterid # gravatar style https://valine.js.org/#/avatar
lang: zh-CN # i18n: zh-CN/zh-TW/en/ja
placeholder: 昵称栏输入QQ获取头像,快输入你的吐槽吧(  ̄▽ ̄)σ # valine comment input placeholder (like: Please leave your footprints)
guest_info: nick,mail,link # valine comment header info (nick/mail/link)
recordIP: false # Record reviewer IP
serverURLs: # This configuration is suitable for domestic custom domain name users, overseas version will be automatically detected (no need to manually fill in)
bg: # valine background
emojiCDN: # emoji CDN
enableQQ: true # enable the Nickname box to automatically get QQ Nickname and QQ Avatar
requiredFields: nick,mail # required fields (nick/mail)添加标签
添加博主 访客 小伙伴 标签:
更换成魔改过的Valine.min.js:
可以直接修改主题配置文件后面# comments 项的 valine 子项链接为 https://cdn.jsdelivr.net/gh/HCLonely/Valine@latest/dist/Valine.min.js
或者可以下载到博客 theme/butterfly/source/js 目录下并更换 valine 子项链接为 /js/Valine.min.js1
2
3
4
5
6
7
8# comments
gitalk: https://cdn.jsdelivr.net/npm/gitalk@latest/dist/gitalk.min.js
gitalk_css: https://cdn.jsdelivr.net/npm/gitalk/dist/gitalk.min.css
#valine: https://cdn.jsdelivr.net/npm/valine/dist/Valine.min.js
valine: /js/Valine.min.js #https://cdn.jsdelivr.net/gh/HCLonely/Valine@latest/dist/Valine.min.js
disqusjs: https://cdn.jsdelivr.net/npm/disqusjs@1/dist/disqus.js
disqusjs_css: https://cdn.jsdelivr.net/npm/disqusjs@1/dist/disqusjs.css
utterances: https://utteranc.es/client.js修改 themes\butterfly\layout\includes\third-party\comments\ 路径下 valine.pug
1
2
3
4
5
6
7
8
9
10
11
12
13
14
15
16
17
18
19
20
21
22
23
24script.
function loadValine () {
function initValine () {
let initData = {
el: '#vcomment',
appId: '#{theme.valine.appId}',
appKey: '#{theme.valine.appKey}',
placeholder: '#{theme.valine.placeholder}',
avatar: '#{theme.valine.avatar}',
meta: '#{theme.valine.guest_info }'.split(','),
pageSize: '#{theme.valine.pageSize}',
lang: '#{theme.valine.lang}',
recordIP: #{theme.valine.recordIP},
serverURLs: '#{theme.valine.serverURLs}',
emojiCDN: '#{theme.valine.emojiCDN}',
emojiMaps: !{emojiMaps},
enableQQ: #{theme.valine.enableQQ},
path: window.location.pathname,
//-添加博主 小伙伴 访客标签新增修改:
master: '', //博主邮箱md5 可使用网站 https://md5jiami.51240.com/ 进行转换
friends: ['',''], //小伙伴邮箱md5
tagMeta: ["博主","小伙伴","访客"],
//-
}主题配置文件 valine 项:
1
2
3
4
5
6
7
8
9
10
11
12
13
14
15
16
17
18
19valine:
appId: # leancloud application app id
appKey: # leancloud application app key
pageSize: 10 # comment list page size
avatar: monsterid # gravatar style https://valine.js.org/#/avatar
lang: zh-CN # i18n: zh-CN/zh-TW/en/ja
placeholder: 昵称栏输入QQ获取头像,快输入你的吐槽吧(  ̄▽ ̄)σ # valine comment input placeholder (like: Please leave your footprints)
guest_info: nick,mail,link # valine comment header info (nick/mail/link)
recordIP: false # Record reviewer IP
serverURLs: # This configuration is suitable for domestic custom domain name users, overseas version will be automatically detected (no need to manually fill in)
bg: # valine background
emojiCDN: # emoji CDN
enableQQ: true # enable the Nickname box to automatically get QQ Nickname and QQ Avatar
requiredFields: nick,mail # required fields (nick/mail)
#新增
metaPlaceholder:
nick: 昵称/QQ号(必填)
mail: 邮箱(必填)
link: 网址(https://)美化评论背景
定义一个myStyle.css放在下面的目录中
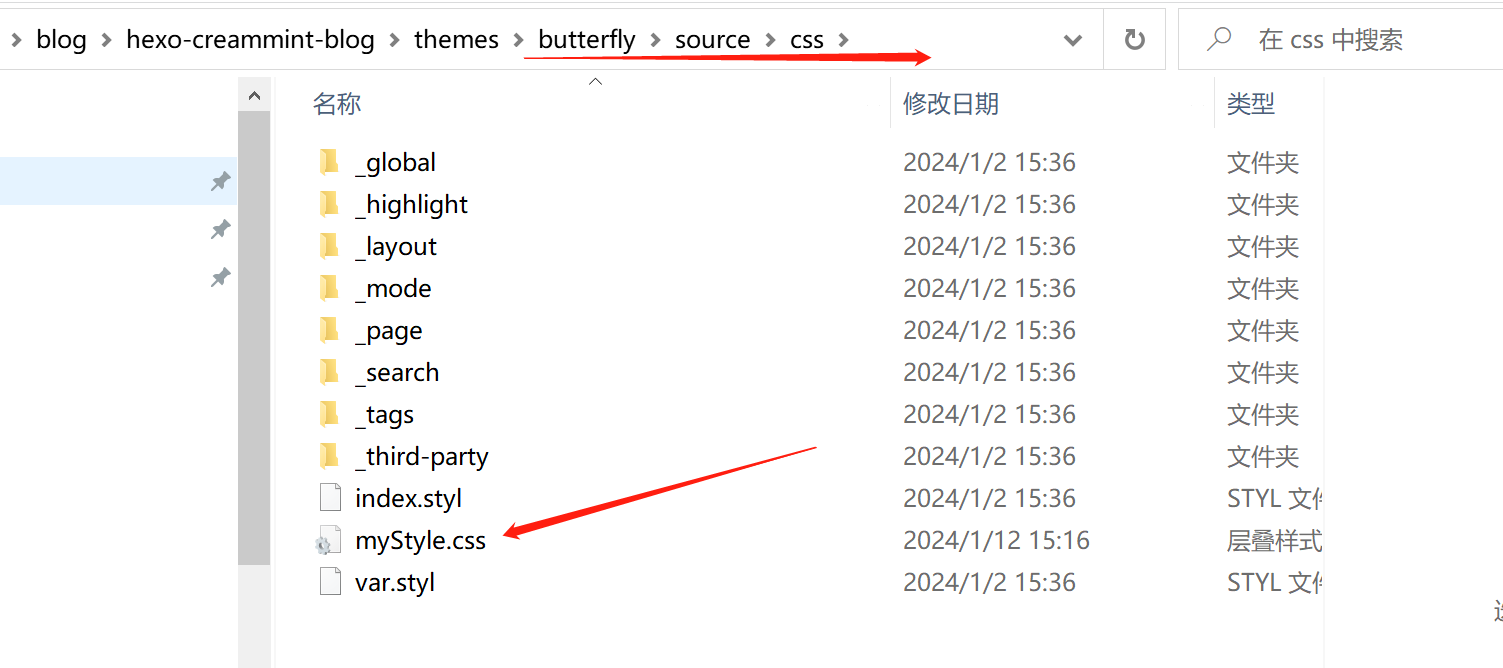
现在我们在主题文件中引入这个文件
1 | # Inject |
在css中写入下面的代码,这里作者的图片放到了css同级目录下的img下,大家也可以直接放超链接,建议大家放动图,这样有感觉吧
1 | #veditor { |
下面的这一行代码,当鼠标聚焦的时候,背景图消失,大家可以选择使用
1 | #veditor:focus{ |
增加QQ头像
配置
Valine 1.4.4版本js地址:
https://cdn.jsdelivr.net/gh/GamerNoTitle/Valine-Magic@master/js/1.0.1/valine.min.js
此版本已修改,可直接套用;
具体修改如下:
打开Valine.min.js,ctrl+F快速查找关键词:(valine1.4.4版)
1 | E.cdn+(0,s.default)(t.get("mail"))+E.params |
定位到:

稍加换行如图所示:(换行按分号换行)
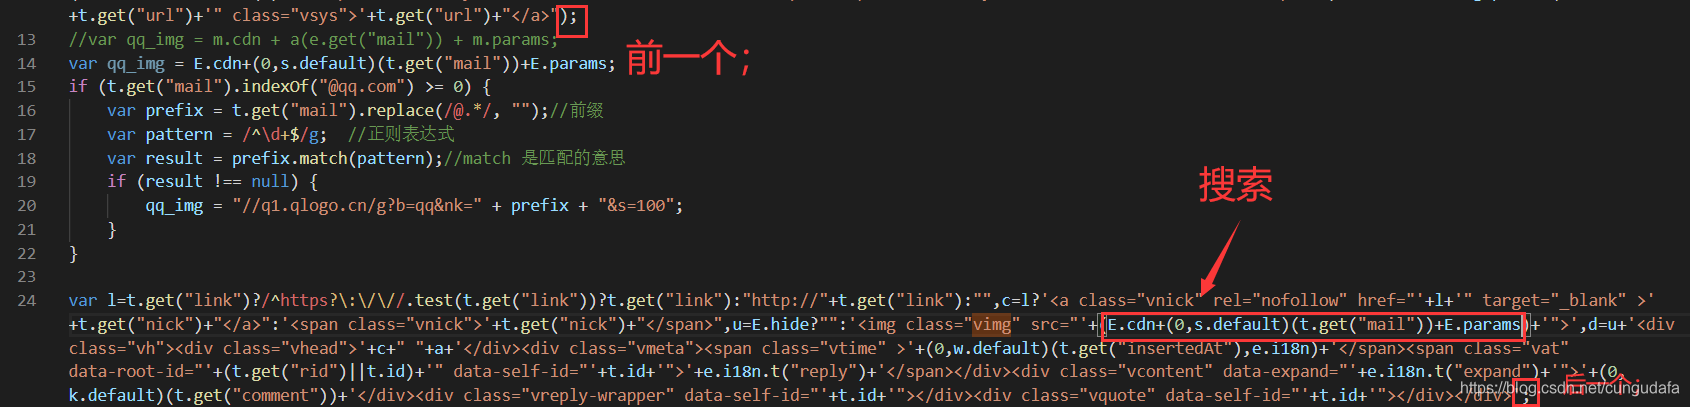
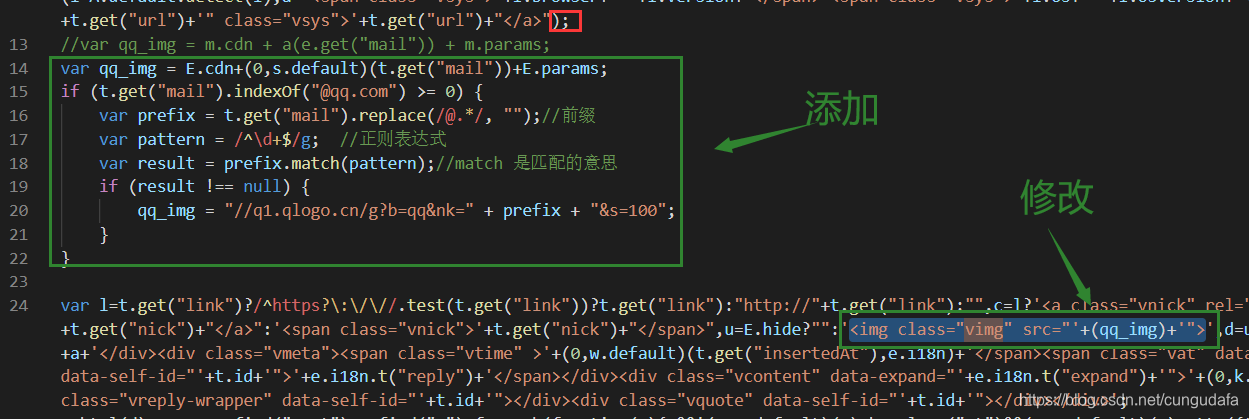
添加部分:(在前一个分号后)
1 | //var qq_img = m.cdn + a(e.get("mail")) + m.params; |
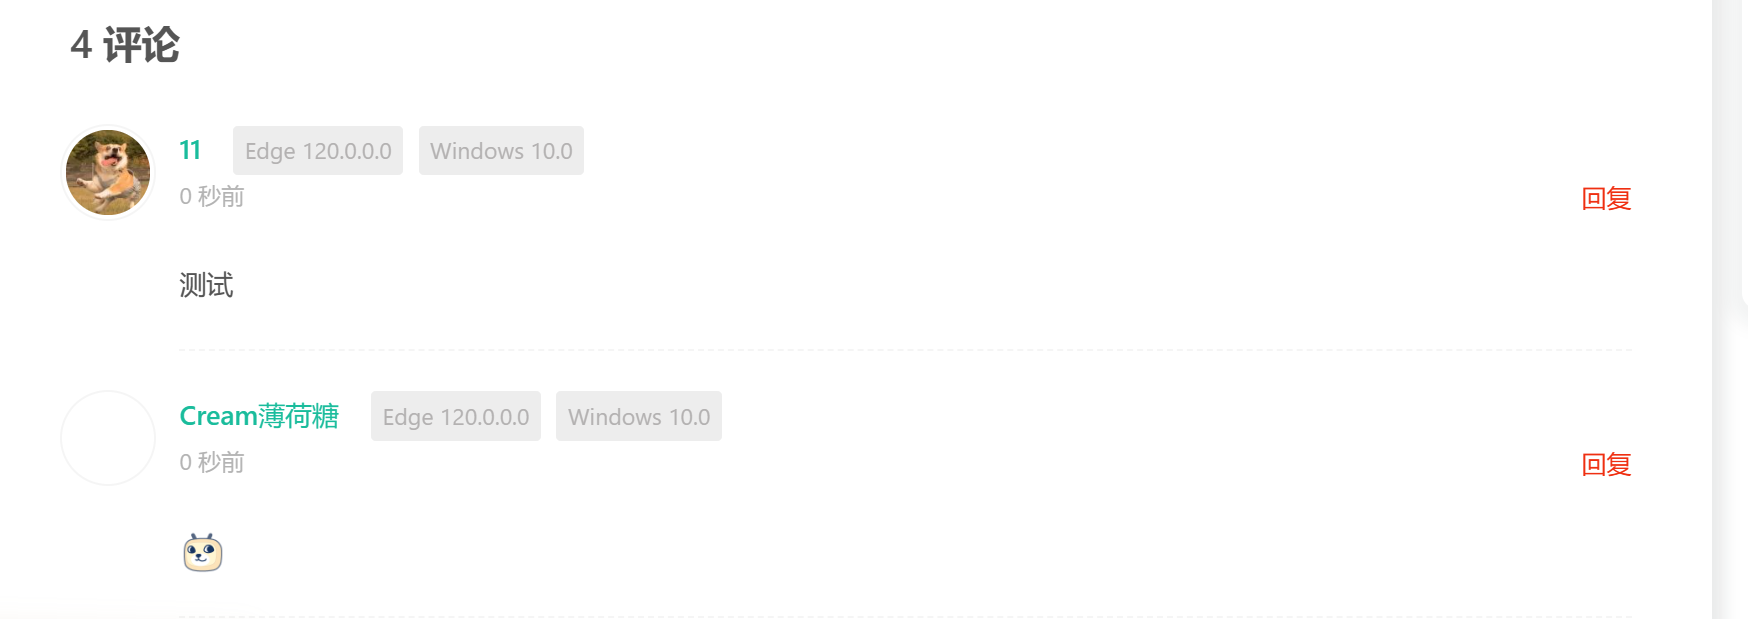
效果
评论框美化
Valine 评论框美化及功能优化::木木木木木 (immmmm.com)
新建一个custom.css文件,增加如下修改:
1 | /* valine评论输入框背景*/ |
修改主题配置文件_config.butterfly.yml,插入css文件;
1 | inject: |
自定义表情
Valine – 自定义表情包(多组) | 2BROEAR - 2B博客
为 Valine 添加自定义表情包
众所周知 Valine 自带 emojis 表情是满足不了一颗折腾的心的/doge,除了使用网上dalao集成好的 Valine.js 外,还可以采取自己动手丰衣足食的做法。
Valine.js v1.4.3 版本已于4月11日更新后支持表情包
Valine 自带的表情组是一个数组对象,那我们就从这个入手;
自定义内容需要了解部分基础的 js 操作
注意,以下思路可能并不适用于,要做到真正的自定义还是需要根据个人需求来操作,这里只是个人的思路。
- 首先定位到 e.exports ,进行emoji表情自定义修改(将对象改为普通数组,该数组的数量会与第二个表情包的数量同步)
- 删除原有 {key:value} 对象,
- 添加表情包数组 [key](数量自定义)
- 定位到r.prototype.bind = function(e) ,
- 添加切换按钮 ii,添加初始变量 ESwitch (用于判断 ESwitch 的值来进行表情包切换)
- 在原有默认表情下(r)i标签下,再 u.create 一个 (rs)img标签并为其 src 赋值(图片库路径)
- 通过判断 ESwitch 的默认值来判断默认显示的表情包
- 定位到t.emoji = { show: function() ,
- 添加额外的点击调用函数 t.semoji
- 调用内部,通过点击时判断一个调用(r)也就是默认的i标签,另一个调用(rs)也就是自定义的img标签
- 定位到 u.on(“click”, i,function(e) {
- 绑定点击事件(对应点击调用函数)
valine评论设置邮件通知和valine-admin后台管理
云引擎部署
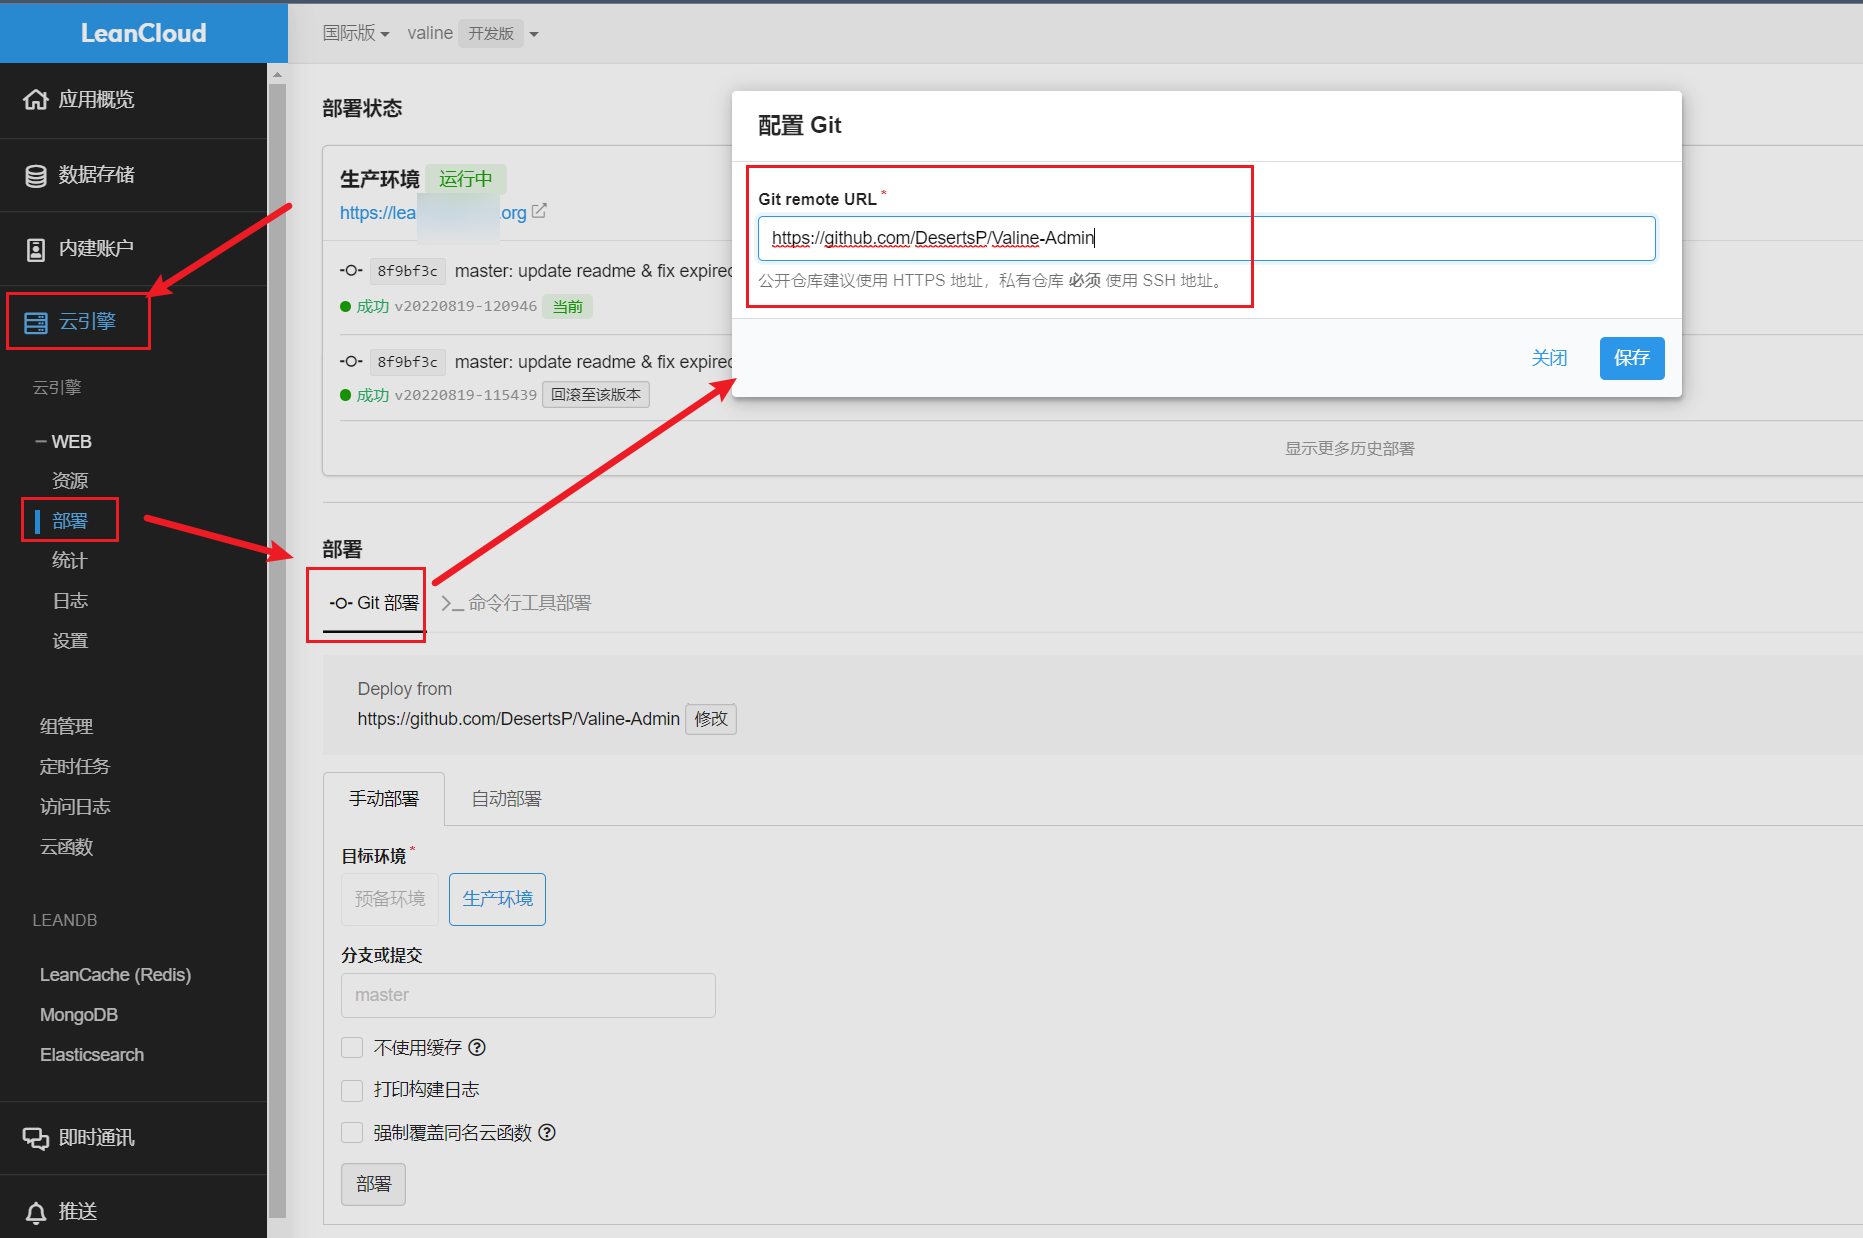
leancloud国际版进入后台,【云引擎】-》【部署】-》选择Git部署,输入Valine-Admin项目地址,保存,手动部署。
1 | https://github.com/DesertsP/Valine-Admin |
添加变量
添加一大批环境变量,这里有些要注意的点。
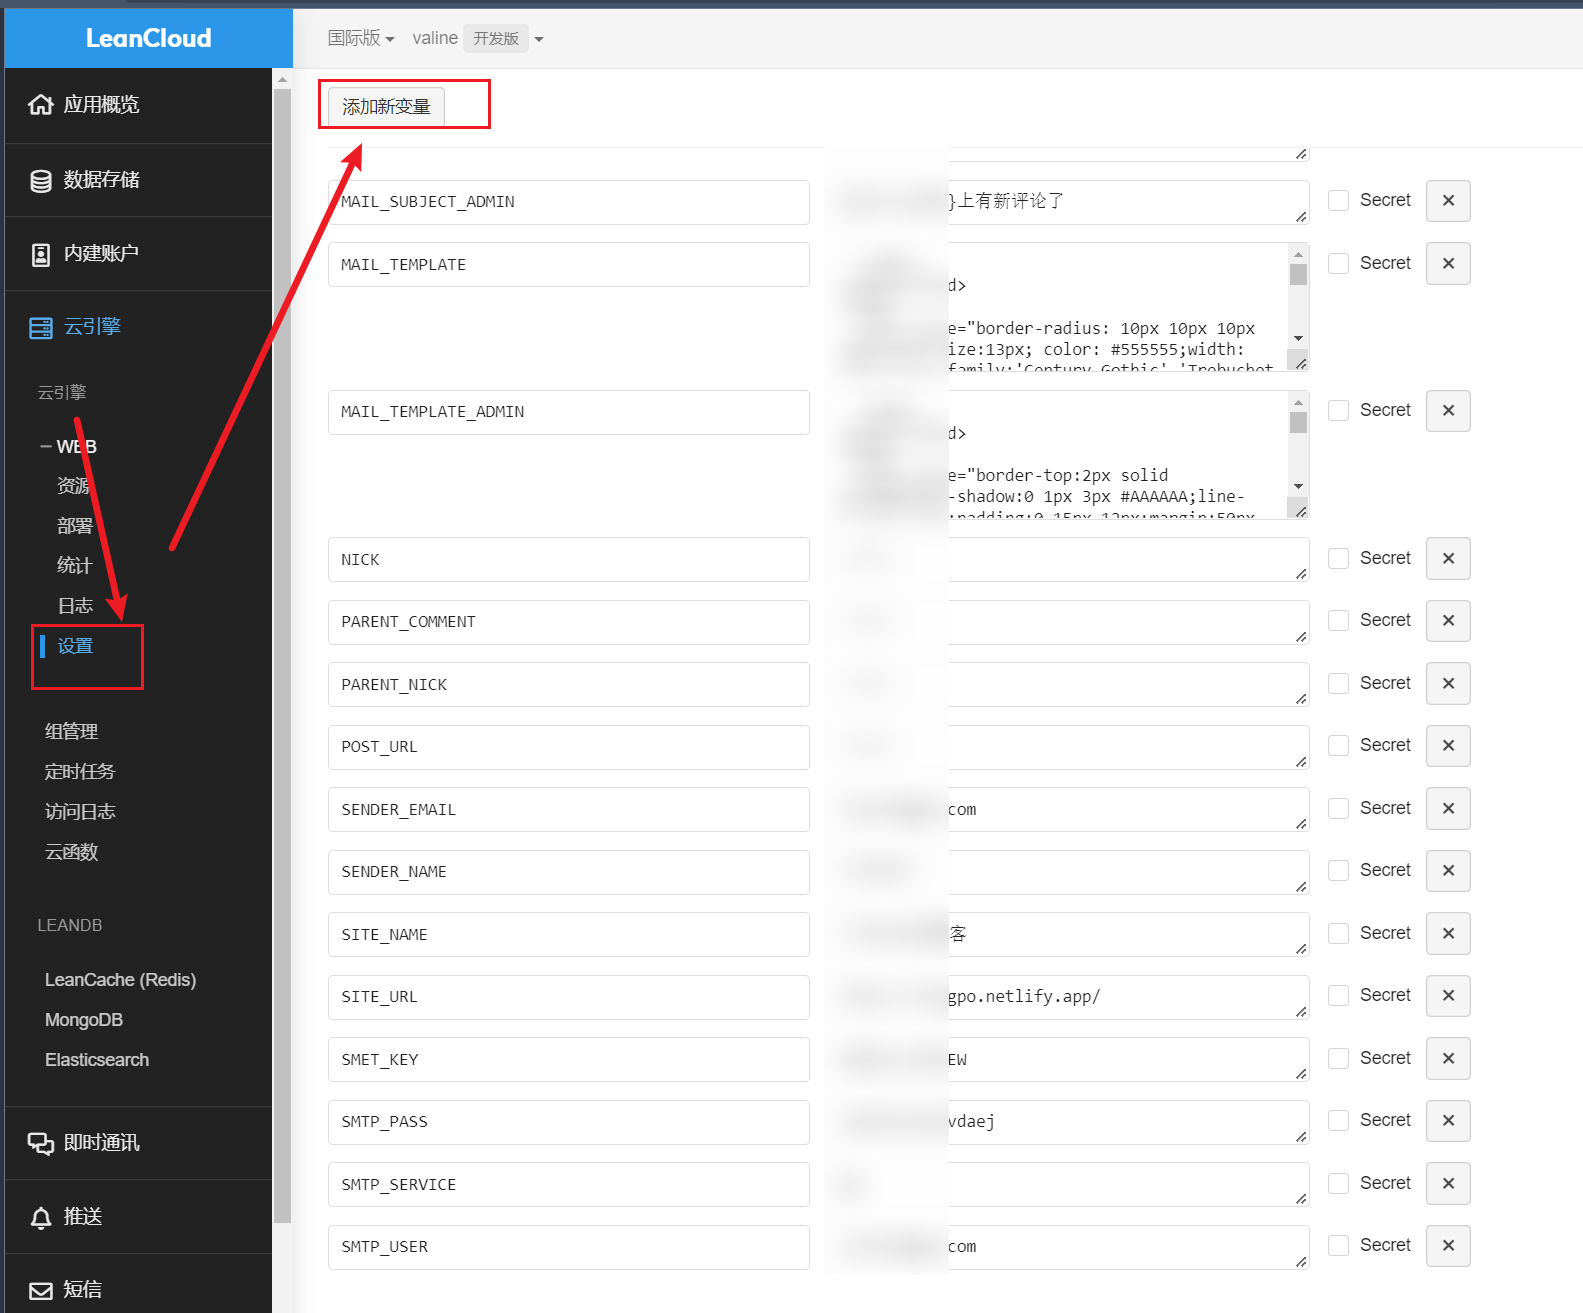
详细说明如下:
| 变量 | 示例 | 说明 |
|---|---|---|
| SITE_NAME | Cream薄荷糖的博客 | [必填] 博客名称 |
| SITE_URL | https://kingpo.netlify.app/ | [必填] 首页地址 |
| SMTP_SERVICE | [必填] 邮件服务提供商,参照 Supported services | |
| SMTP_USER | xxxxxx@qq.com | [必填] SMTP 用户名 |
| SMTP_PASS | ccxxxxxxxxch | [必填] SMTP 授权码(非邮箱独立密码!),参照客户端设置:邮箱授权码 |
| SENDER_NAME | Cream薄荷糖 | [必填] 发件人 |
| SENDER_EMAIL | xxxxxx@qq.com | [必填] 发件邮箱 |
| MAIL_SUBJECT | ${PARENT_NICK},您在${SITE_NAME}上的评论收到了回复 | [必填]@通知邮件主题(标题)模板 |
| MAIL_TEMPLATE | 填下文MAIL_TEMPLATE代码块 | [必填]@通知邮件内容模板 |
| MAIL_SUBJECT_ADMIN | ${SITE_NAME}上有新评论了 | [必填] 博主邮件通知主题模板 |
| MAIL_TEMPLATE_ADMIN | 填下文MAIL_TEMPLATE_ADMIN代码块 | [必填] 博主邮件通知内容模板 |
| SMTP_HOST | smtp.qq.com | [必填] SMTP_SERVICE 留空时,自定义 SMTP 服务器地址 |
| SMTP_PORT | 465或587,参照 POP3 与 SMTP | [必填] SMTP_SERVICE 留空时,自定义 SMTP 端口 |
| SMTP_SECURE | true | [选填] SMTP_SERVICE 留空时填写 |
| BLOGGER_EMAIL | xxxxx@gmail.com | [选填] 博主通知收件地址,默认使用 SENDER_EMAIL |
| ADMIN_URL | https://lean.kinpo.eu.org/ | 评论管理后台地址 |
| COMMENT | 新评论内容 | |
| NICK | 新评论者昵称 | |
| PARENT_COMMENT | 父级评论内容 | |
| PARENT_NICK | 收件人昵称(被@者,父级评论人) | |
| POST_URL | 评论文章地址(完整路径) |
MAIL_TEMPLATE代码块:
1 | <html> |
MAIL_TEMPLATE_ADMIN代码块:
1 | <html> |
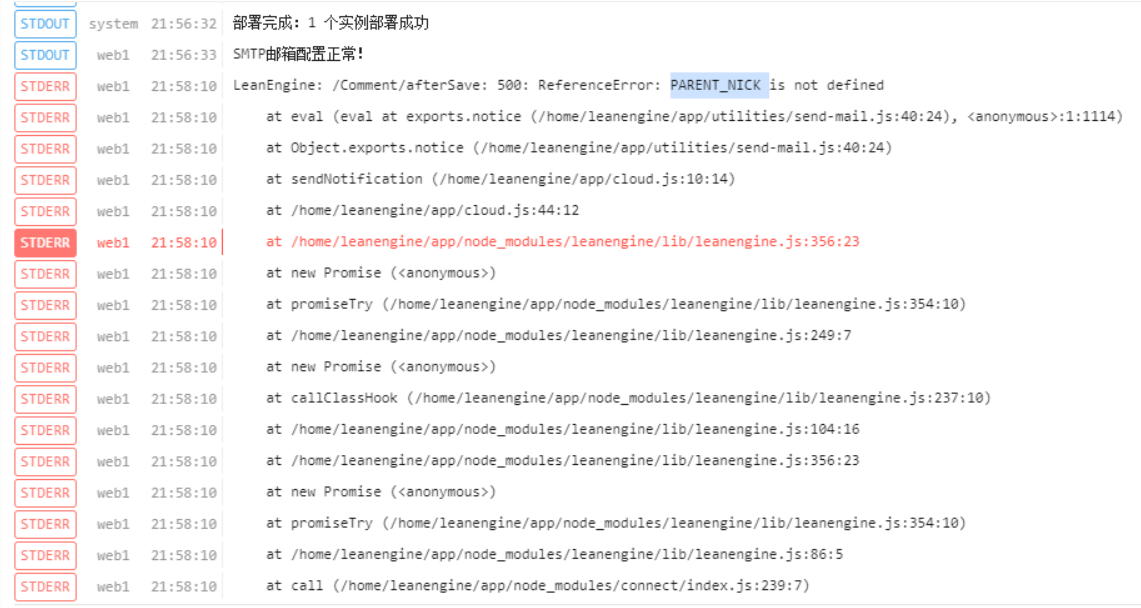
这里注意,**MAIL_TEMPLATE_ADMIN代码块:** 和 MAIL_TEMPLATE代码块: 两个模板的内容不要搞反,我参考valine-admin-document/发现是填反了,会报错,报错日志如下 !
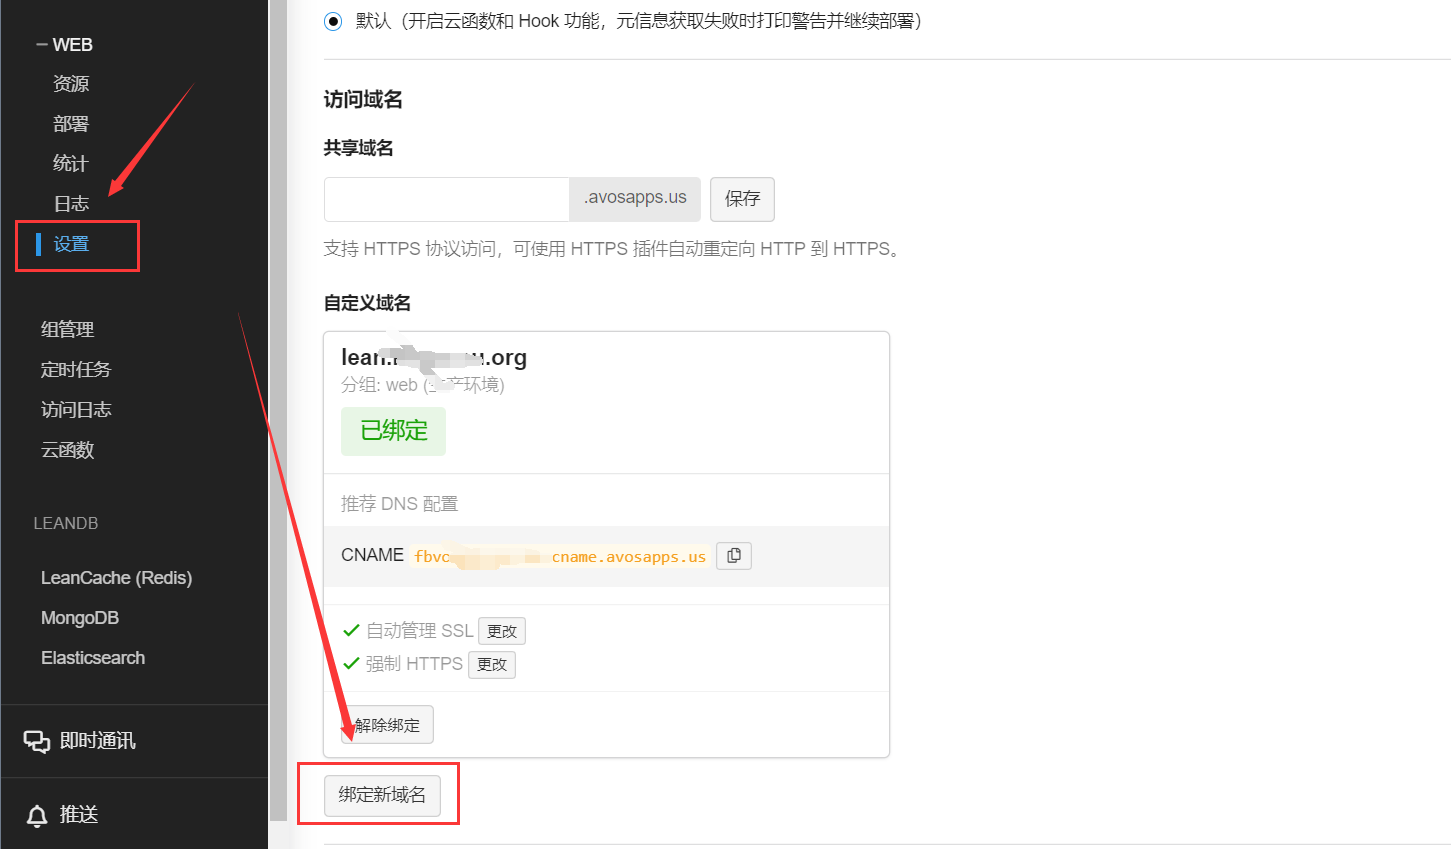
绑定自定义域名
这里需要绑定自定义域名一个域名,它是你后台评论管理的地址,在你定义的域名解析中添加一条CNAME记录。
评论管理
绑定自定义域名后,第1步也部署好后,即可进行评论管理。
首次使用需要先访问管理员注册页面https://绑定的域名/sign-up,注册管理员登录信息,然后直接使用域名就可以登录了。功能也比较简单,标记垃圾评论,删除,跳转查看。
定时任务设置
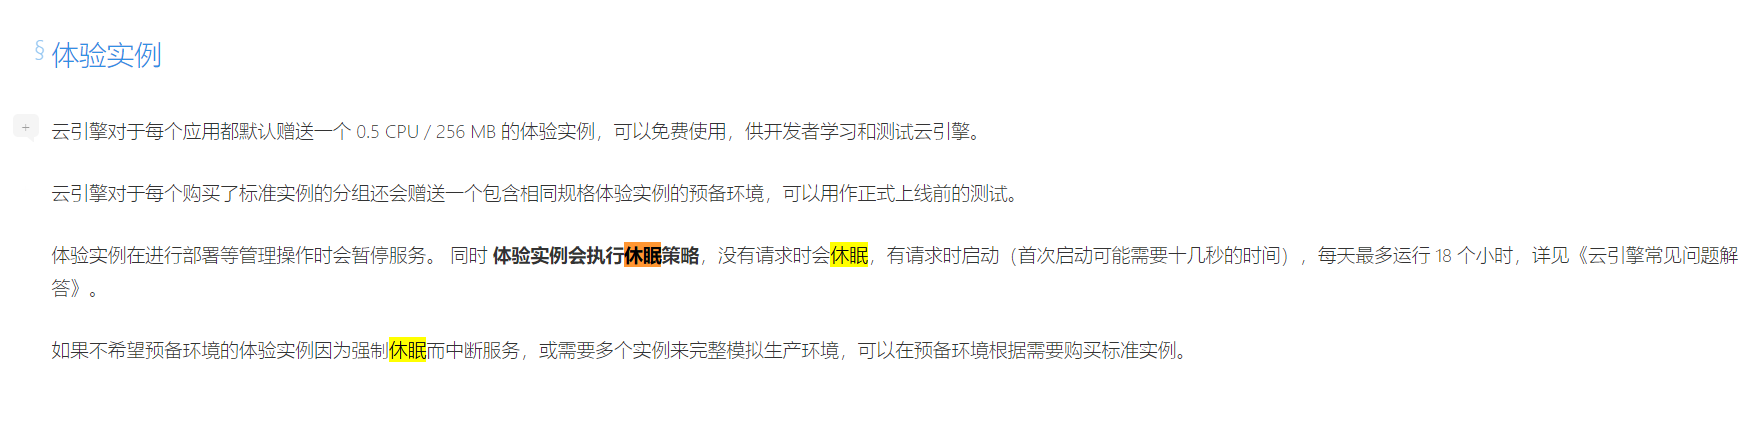
因为leancloud免费版本提供的实例,有休眠策略,如果没有请求,会自动休眠。为了保持实例一直在线,我们可以设置定时任务函数来来唤醒。
- 两个定时任务函数设置
- 利用github actions设置定时
设置定时任务函数,很多人运行几天后会遇到leancloud平台因为流控原因无法激活定时唤醒任务的问题。
另一种方式是利用github actions中的workflow定时执行命令访问leancloud的web域名,实现唤醒。
仓库->settings->secrets->actions->New repository secret Name: DOMAIN Value: 你的web域名
1 | name: 'wake comment system' |